As you gather your family and friends for a meal, the Seven Layer Salad is the perfect centerpiece. This vibrant dish not only looks appealing but also offers a delightful mix of flavors and textures. Ideal for brunches, barbecues, or potlucks, this salad is versatile enough to cater to various tastes. The distinct layers create a beautiful presentation, while the creamy dressing ties everything together. Enjoy the ease of preparation, as this salad can be made in advance!
Jump to:
- Why You’ll Love This Recipe
- Tools and Preparation
- Essential Tools and Equipment
- Importance of Each Tool
- Ingredients
- For the Dressing
- For the Salad Layers
- How to Make Seven Layer Salad
- Step 1: Prepare the Dressing
- Step 2: Assemble the Layers
- Step 3: Add Dressing and Final Layers
- Step 4: Serve or Refrigerate
- How to Serve Seven Layer Salad
- For a Casual Gathering
- For a Formal Dinner
- Seasonal Celebrations
- How to Perfect Seven Layer Salad
- Best Side Dishes for Seven Layer Salad
- Common Mistakes to Avoid
- Storage & Reheating Instructions
- Refrigerator Storage
- Freezing Seven Layer Salad
- Reheating Seven Layer Salad
- Frequently Asked Questions
- How long does Seven Layer Salad last?
- Can I customize my Seven Layer Salad?
- What is the best way to layer my Seven Layer Salad?
- Is Seven Layer Salad suitable for meal prep?
- Final Thoughts
- 📖 Recipe Card
Why You’ll Love This Recipe
- Visual Appeal: The colorful layers make it an eye-catching dish that impresses guests.
- Make-Ahead Friendly: Prepare this salad up to 24 hours in advance for stress-free entertaining.
- Customizable Layers: Swap ingredients easily based on personal preferences or seasonal availability.
- Rich Flavor Profile: The combination of creamy dressing with fresh vegetables and Turkey Bacon delivers satisfying flavors.
- Large Servings: Perfect for gatherings with 10 to 12 servings, making it an excellent choice for parties.
Tools and Preparation
To prepare your Seven Layer Salad successfully, you’ll need some essential tools. Having the right equipment makes the process easier and more enjoyable.
Essential Tools and Equipment
- Trifle dish or large glass bowl
- Medium mixing bowl
- Whisk
- Spatula
Importance of Each Tool
- Trifle dish or large glass bowl: These allow you to showcase the beautiful layers while making serving easy.
- Medium mixing bowl: Perfect for mixing your dressing without making a mess.
- Whisk: Ensures that your dressing is well combined and smooth.
- Spatula: Helps spread the dressing evenly over the layers without disturbing them.
Ingredients
For the Dressing
- 3/4 cup mayonnaise
- 3/4 cup sour cream
- 1 tablespoon white apple vinegar
- 1 teaspoon sugar
- Salt and pepper
For the Salad Layers
- 8 cups chopped iceberg lettuce (about 1 large head)
- 1 (10-ounce) package frozen peas, defrosted and patted dry
- 1 1/2 cups finely chopped red onion (about 1/2 large onion), optional
- 1 pint cherry or grape tomatoes, quartered
- 6 hard-boiled eggs, peeled and chopped
- 1 cup/4 ounces shredded sharp Cheddar
- 12 ounces sliced Turkey Bacon, cooked and diced or crumbled
How to Make Seven Layer Salad
Step 1: Prepare the Dressing
- In a medium bowl, combine the mayonnaise, sour cream, white apple vinegar, and sugar.
- Whisk until smooth.
- Add salt and pepper to taste. Cover and refrigerate while assembling the salad.
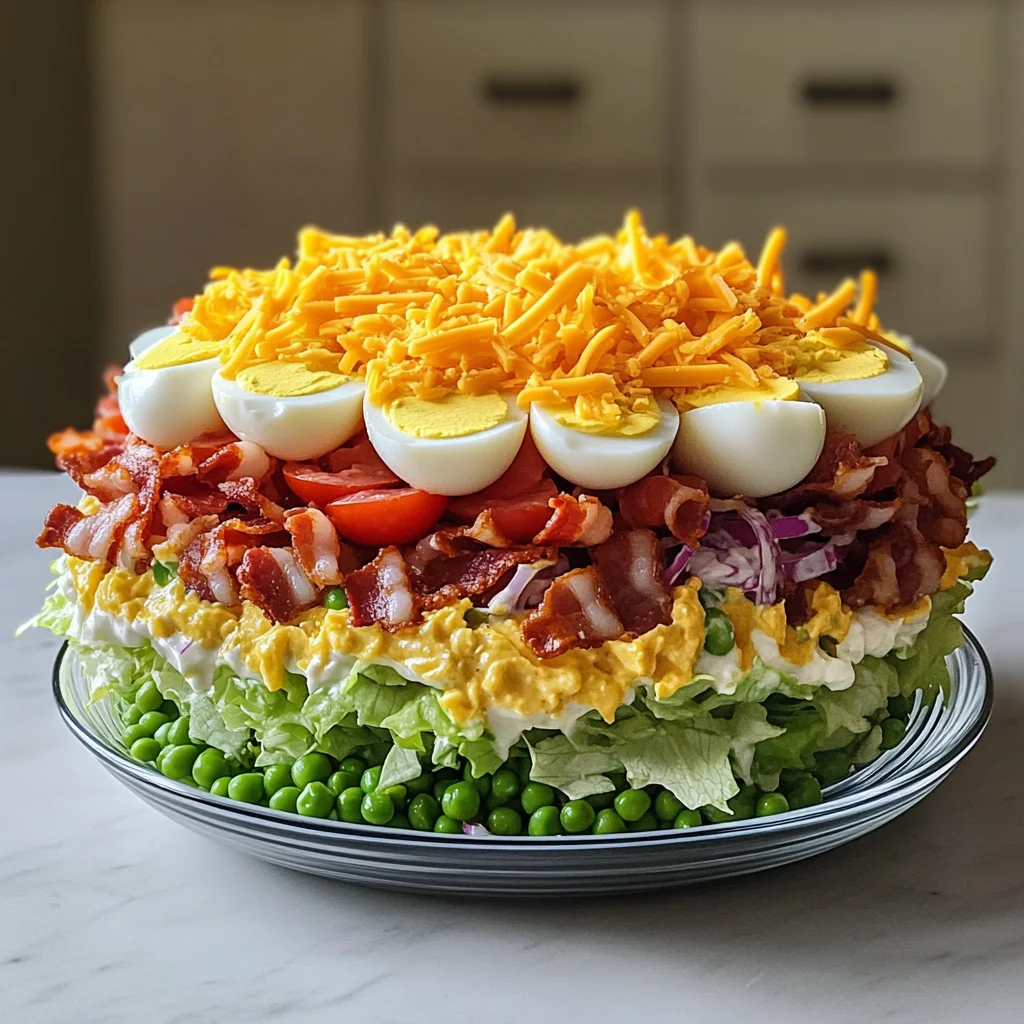
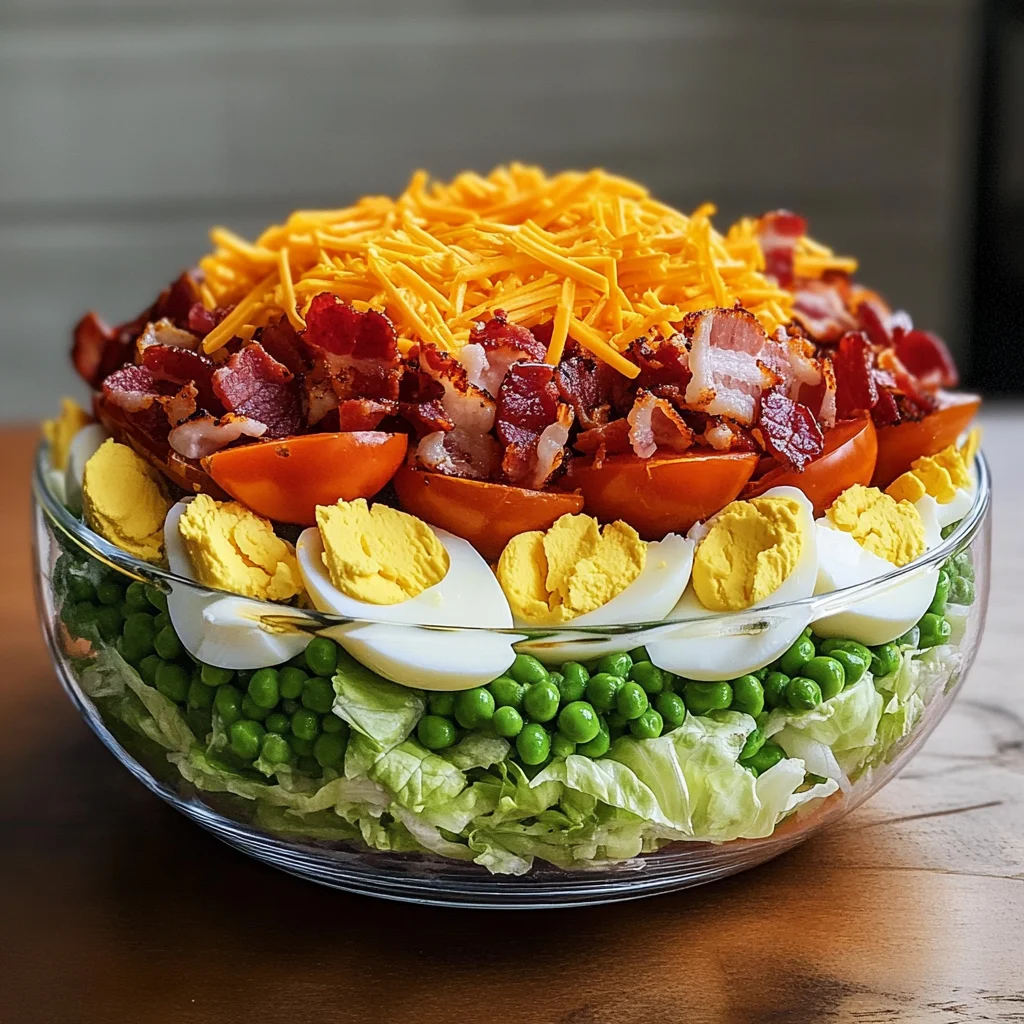
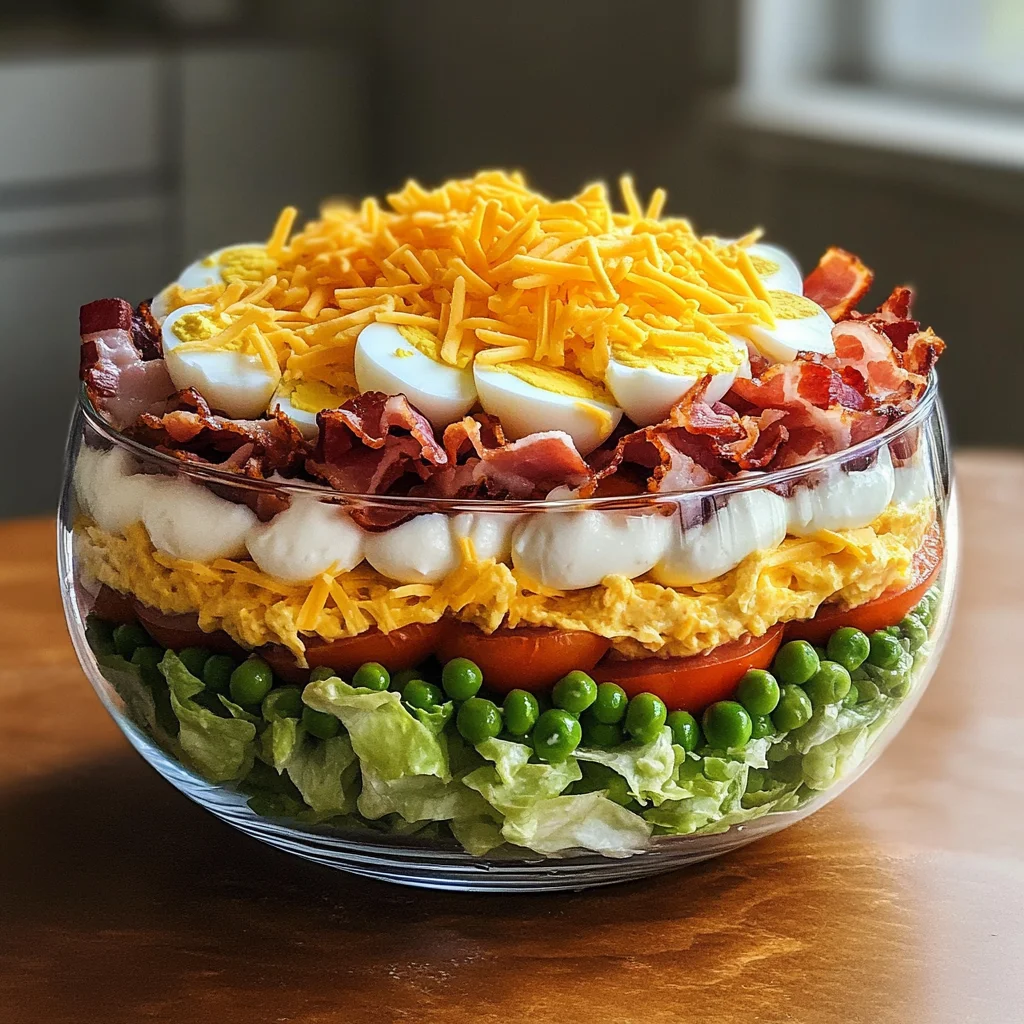
Step 2: Assemble the Layers
- Place the chopped lettuce at the bottom of a trifle dish or large glass bowl.
- Arrange peas in an even layer on top of the lettuce.
- If using, add finely chopped red onion next.
- Follow with quartered cherry or grape tomatoes as another layer.
- Layer hard-boiled eggs on top of the tomatoes.
Step 3: Add Dressing and Final Layers
- Spoon dollops of dressing over the egg layer, gently spreading it with a spatula to cover completely.
- Sprinkle shredded cheddar cheese evenly over the dressing layer.
- Finally, add diced or crumbled Turkey Bacon on top.
Step 4: Serve or Refrigerate
- Serve immediately or cover with plastic wrap and refrigerate for up to 24 hours before serving. Scoop from the bottom to enjoy all layers when serving!
How to Serve Seven Layer Salad
Seven Layer Salad is a delightful dish that not only looks stunning but also tastes amazing. This layered masterpiece can be served in many enjoyable ways, making it perfect for various occasions.
For a Casual Gathering
- Buffet Style: Set the salad at the center of your buffet table, allowing guests to serve themselves. This encourages mingling and makes serving easy.
- Individual Portions: Use small clear cups to serve single portions of the salad. This adds a fun twist and makes it easy for guests to grab and go.
For a Formal Dinner
- Trifle Dish Centerpiece: Present your Seven Layer Salad in a beautiful trifle dish as a centerpiece on the dining table. The layers will attract attention and invite curiosity.
- With Elegant Utensils: Pair the salad with elegant serving utensils to enhance the dining experience. Consider using glass or silver serving spoons.
Seasonal Celebrations
- Summer Picnics: Take the salad outdoors! It’s refreshing and pairs beautifully with grilled meats or sandwiches at summertime picnics.
- Holiday Parties: Serve as part of your holiday spread. Its vibrant colors make it an appealing addition to any festive table.
How to Perfect Seven Layer Salad
Creating a perfect Seven Layer Salad requires attention to detail and some helpful tips for the best results.
- bold layer carefully: Start by layering each ingredient gently to maintain distinct layers, ensuring each component is visible.
- bold keep ingredients fresh: Store any leftovers in an airtight container in the refrigerator. This keeps your salad fresh for longer.
- bold chill before serving: Allow the salad to chill in the fridge for at least one hour before serving. This enhances flavor and texture.
- bold customize layers: Feel free to swap ingredients according to your preference, such as using avocado instead of eggs or adding different vegetables.
Best Side Dishes for Seven Layer Salad
Pairing side dishes with your Seven Layer Salad can elevate your meal experience. Here are some delicious options:
- bold Grilled Chicken Skewers: Tender chicken marinated in herbs and spices, grilled to perfection.
- bold Garlic Breadsticks: Soft breadsticks brushed with garlic butter, making them a favorite alongside salads.
- bold Roasted Vegetables: A colorful mix of seasonal veggies roasted until caramelized, adding depth to your meal.
- bold Quinoa Pilaf: Nutty quinoa cooked with herbs and vegetables, providing a nutritious complement.
- bold Fruit Salad: A refreshing blend of seasonal fruits that balances the richness of the salad.
- bold Cheesy Garlic Mashed Potatoes: Creamy mashed potatoes infused with garlic and topped with melted cheese for comfort.
- bold Corn on the Cob: Sweet corn grilled or boiled, adding a delightful crunch next to your layered creation.
- bold Classic Coleslaw: Crunchy coleslaw with a tangy dressing enhances both flavor and texture when served together.
Common Mistakes to Avoid
It’s easy to make a layered salad, but a few common mistakes can affect your final dish. Here are some pitfalls to watch out for:
- Skipping the chilling step: Not allowing the dressing to chill can lead to an unbalanced flavor. Always refrigerate it before assembling your salad.
- Layering incorrectly: Placing ingredients in the wrong order can cause them to mix too soon. Start with lettuce and finish with dressing on top.
- Using wet vegetables: Adding wet or soggy vegetables can make your salad watery. Ensure your veggies, like frozen peas, are dry before layering.
- Ignoring customization options: Sticking strictly to the traditional recipe limits creativity. Feel free to swap ingredients based on your preferences.
- Not serving immediately: Waiting too long to serve can make the salad lose its crispness. Ideally, serve it right after preparation or within 24 hours.
Storage & Reheating Instructions
Refrigerator Storage
- Store in an airtight container for up to 24 hours for optimal freshness.
- If you’ve already mixed the layers, consume within a few hours for the best texture.
Freezing Seven Layer Salad
- Freezing is not recommended due to texture changes in vegetables and dressing when thawed.
Reheating Seven Layer Salad
- Oven: This salad does not require reheating; serve cold from the fridge.
- Microwave: Avoid microwaving as it will alter the texture of fresh ingredients.
- Stovetop: Not applicable; best served cold and fresh.
Frequently Asked Questions
Here are some common questions about making a Seven Layer Salad:
How long does Seven Layer Salad last?
Seven Layer Salad is best enjoyed within 24 hours if stored properly in the refrigerator.
Can I customize my Seven Layer Salad?
Yes! You can substitute ingredients like using crunchy cucumbers instead of peas or adding avocado instead of eggs.
What is the best way to layer my Seven Layer Salad?
Start with lettuce at the bottom, followed by peas, onions (if using), tomatoes, eggs, dressing, cheese, and finally Turkey Bacon on top.
Is Seven Layer Salad suitable for meal prep?
Absolutely! It’s a fantastic make-ahead dish that holds up well when stored correctly, making it perfect for busy weeks.
Final Thoughts
This Seven Layer Salad is not only visually appealing but also versatile and delicious. With its layers of fresh ingredients and creamy dressing, it’s a perfect addition to any meal. Feel free to customize it according to your taste preferences and enjoy this refreshing dish at any gathering!
Did You Enjoy Making This Recipe? Please rate this recipe with ⭐⭐⭐⭐⭐ or leave a comment.
📖 Recipe Card
Print
Seven Layer Salad
- Total Time: 0 hours
- Yield: Serves approximately 10 to 12 people 1x
Description
Transform your gatherings with our colorful and delicious Seven Layer Salad. This vibrant dish is not only visually stunning but also packed with fresh flavors and textures, making it an ideal centerpiece for brunches, barbecues, or potlucks. The layered presentation entices the eye, while the creamy dressing beautifully ties the ingredients together. Best of all, you can prepare this make-ahead salad up to 24 hours in advance, allowing you to enjoy stress-free entertaining. Customize the layers with seasonal vegetables or personal preferences for a unique twist every time!
Ingredients
- 8 cups chopped iceberg lettuce
- 10 ounces frozen peas (defrosted)
- 1 ½ cups finely chopped red onion (optional)
- 1 pint cherry or grape tomatoes (quartered)
- 6 hard-boiled eggs (peeled and chopped)
- 4 ounces shredded sharp Cheddar cheese
- 12 ounces cooked and diced Turkey Bacon
- ¾ cup mayonnaise
- ¾ cup sour cream
- 1 tablespoon white apple vinegar
- 1 teaspoon sugar
- Salt and pepper to taste
Instructions
- In a medium bowl, mix together ¾ cup mayonnaise, ¾ cup sour cream, 1 tablespoon white apple vinegar, and 1 teaspoon sugar. Whisk until smooth and season with salt and pepper to taste. Refrigerate.
- In a trifle dish or large glass bowl, layer the ingredients starting with chopped lettuce at the bottom. Add peas, red onion (if using), tomatoes, hard-boiled eggs, followed by dollops of dressing.
- Sprinkle shredded cheese over the dressing layer and top with diced Turkey Bacon.
- Serve immediately or cover tightly with plastic wrap and refrigerate for up to 24 hours before serving.
- Prep Time: 20 minutes
- Cook Time: None
- Category: Salad
- Method: None
- Cuisine: American
Nutrition
- Serving Size: 1 serving
- Calories: 280
- Sugar: 3g
- Sodium: 650mg
- Fat: 18g
- Saturated Fat: 5g
- Unsaturated Fat: 12g
- Trans Fat: 0g
- Carbohydrates: 22g
- Fiber: 5g
- Protein: 10g
- Cholesterol: 165mg