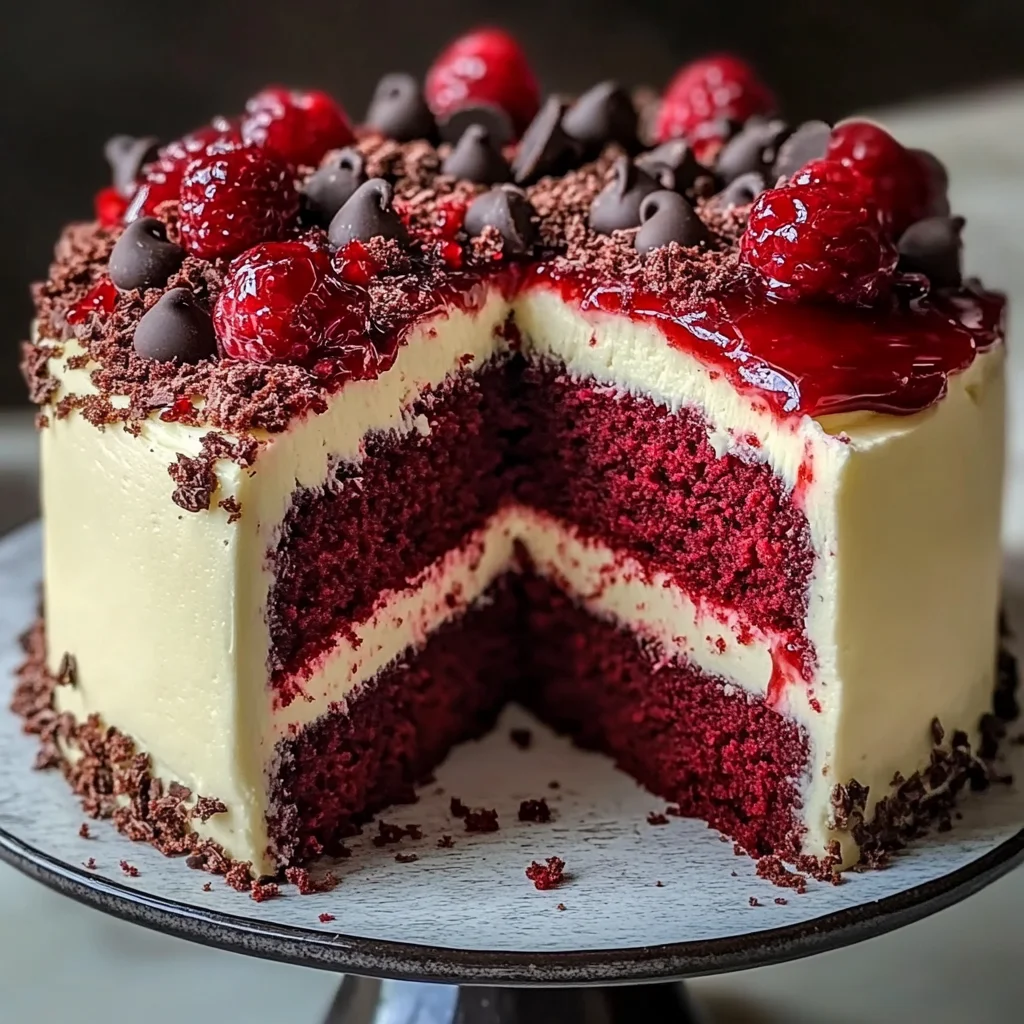
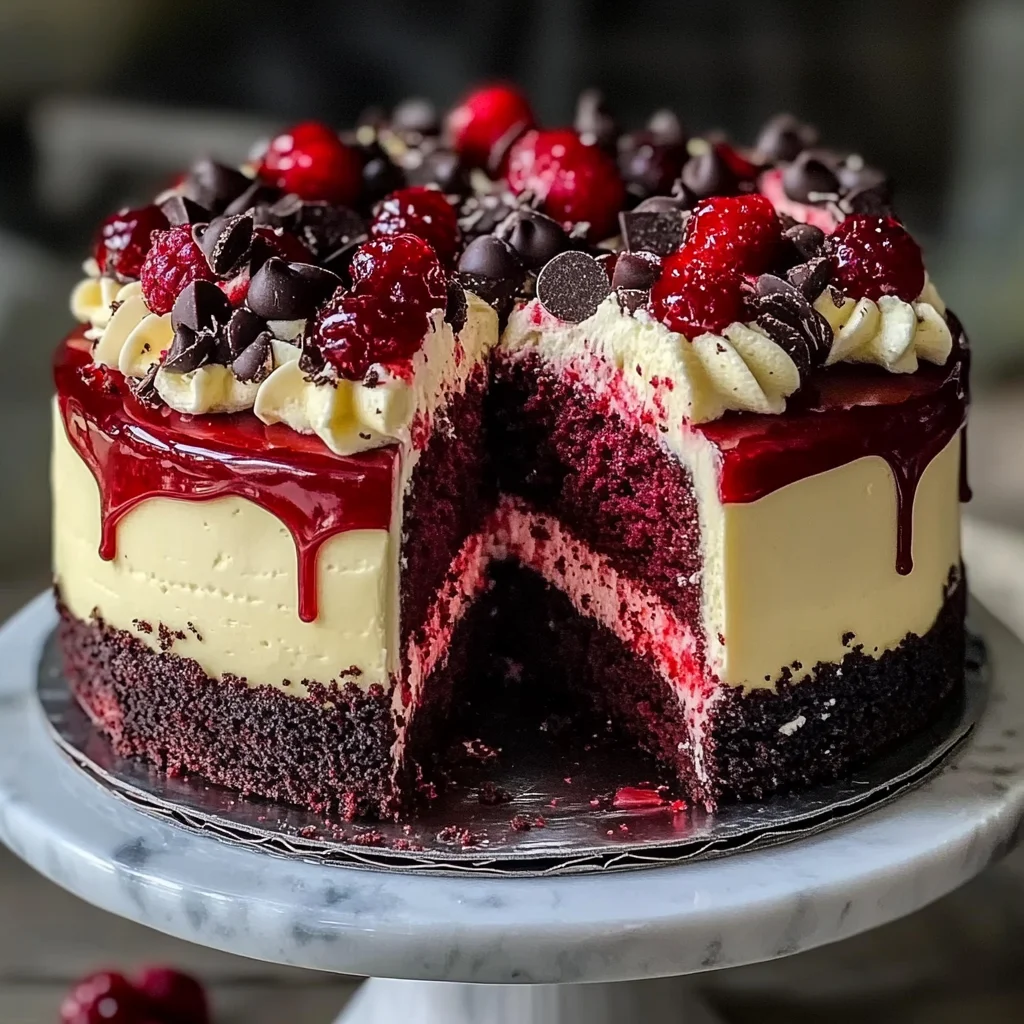
This Red Velvet Cheesecake Layer Cake Recipe is a delightful fusion of rich cheesecake and the iconic flavor of red velvet cake. Perfect for birthdays, anniversaries, or any celebration, this stunning dessert promises to impress your guests and satisfy your sweet cravings. With its moist layers, creamy center, and beautiful presentation, it’s a treat that stands out on any dessert table.
Jump to:
- Why You’ll Love This Recipe
- Tools and Preparation
- Essential Tools and Equipment
- Importance of Each Tool
- Ingredients
- For the Chocolate Cookie Crust
- For the Red Velvet Cake Layers
- For the Cheesecake Layer
- For the Cream Cheese Frosting
- For the Berry Glaze and Decoration
- How to Make Red Velvet Cheesecake Layer Cake Recipe
- Step 1: Prepare the Chocolate Cookie Crust
- Step 2: Bake the Red Velvet Cake Layers
- Step 3: Prepare the Cheesecake Layer
- Step 4: Assemble the Cake
- Step 5: Add Finishing Touches
- How to Serve Red Velvet Cheesecake Layer Cake Recipe
- For a Festive Touch
- With Beverages
- For Special Occasions
- How to Perfect Red Velvet Cheesecake Layer Cake Recipe
- Best Side Dishes for Red Velvet Cheesecake Layer Cake Recipe
- Common Mistakes to Avoid
- Storage & Reheating Instructions
- Refrigerator Storage
- Freezing Red Velvet Cheesecake Layer Cake Recipe
- Reheating Red Velvet Cheesecake Layer Cake Recipe
- Frequently Asked Questions
- What is the best way to color the cake?
- Can I use different kinds of frosting?
- How do I prevent my cheesecake from cracking?
- How long should I chill the cheesecake layer?
- Can I customize this recipe?
- Final Thoughts
- 📖 Recipe Card
Why You’ll Love This Recipe
- Decadent Flavor: The combination of red velvet and cheesecake creates a rich and indulgent taste experience.
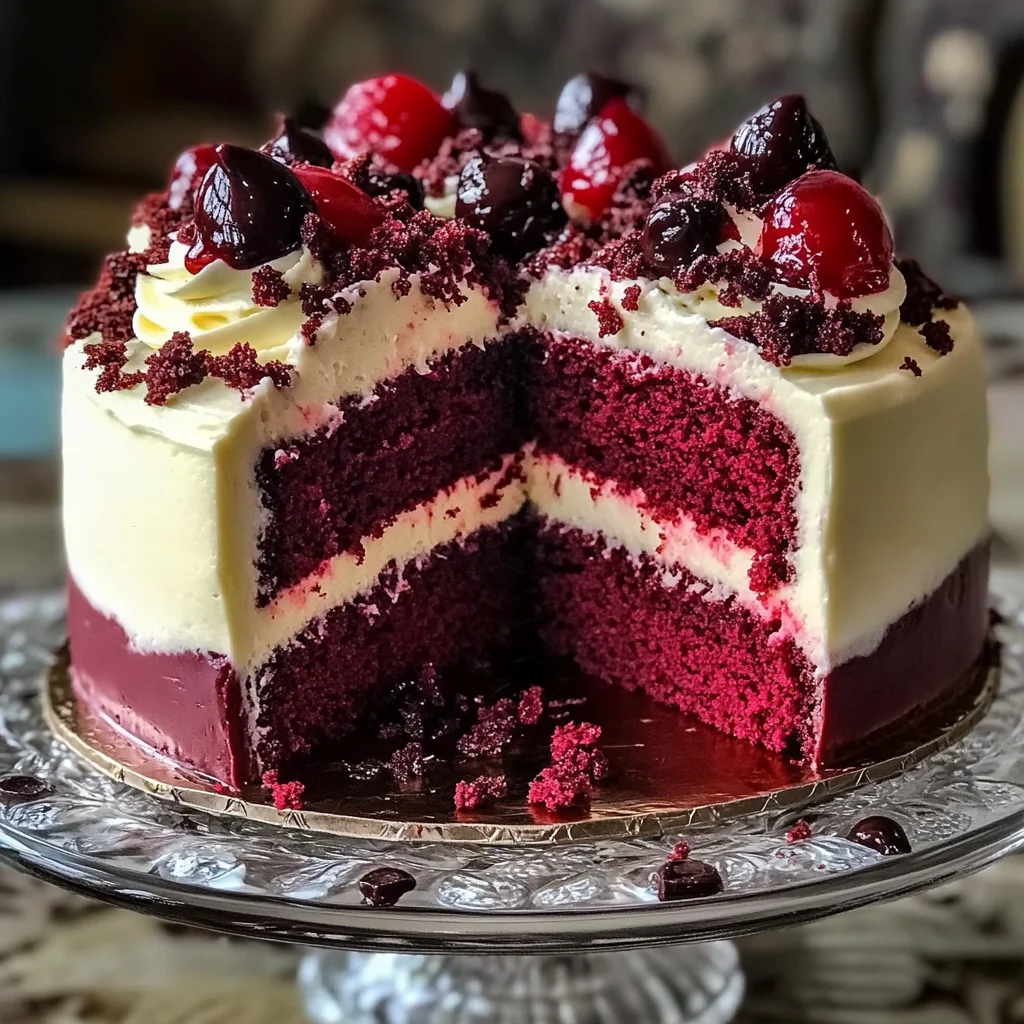
- Stunning Presentation: The vibrant red color paired with a glossy berry glaze makes this cake visually striking.
- Versatile Delight: Suitable for various occasions, from birthdays to holidays, this cake is sure to be a crowd-pleaser.
- Easy to Follow: With clear steps and accessible ingredients, you can confidently create this show-stopping dessert at home.
- Customizable Toppings: Feel free to add your favorite toppings like nuts or fruits for an extra layer of flavor.
Tools and Preparation
Before diving into making this delightful cake, gather the necessary tools and equipment for a smooth baking experience.
Essential Tools and Equipment
- Springform pan
- Mixing bowls
- Whisk
- Electric mixer
- Measuring cups and spoons
- Spatula
- Baking sheets
Importance of Each Tool
- Springform pan: Allows easy removal of the cheesecake layer without damaging it.
- Electric mixer: Ensures smooth batter consistency for both the cheesecake and frosting.
- Measuring cups and spoons: Accurate measurements are crucial for achieving perfect results in baking.
Ingredients
For the Chocolate Cookie Crust
- 2 cups (200 g) chocolate cookie crumbs (Oreo or similar, without filling)
- ½ cup (115 g) unsalted butter, melted
For the Red Velvet Cake Layers
- 2 ½ cups (315 g) all-purpose flour
- 1 ½ cups (300 g) sugar
- 2 tbsp cocoa powder
- 1 tsp baking soda
- 1 tsp baking powder
- 1 tsp salt
- 1 ½ cups (360 ml) buttermilk (or milk + 1 tbsp vinegar)
- 1 cup (240 ml) vegetable oil
- 2 large eggs
- 2 tsp vanilla extract
- 1 tsp white vinegar
- 1–2 tbsp red gel food coloring
For the Cheesecake Layer
- 16 oz (450 g) cream cheese, softened
- ½ cup (100 g) sugar
- 2 large eggs
- 1 tsp vanilla extract
- ½ cup (120 ml) sour cream or heavy cream
For the Cream Cheese Frosting
- 16 oz (450 g) cream cheese, softened
- 1 cup (230 g) unsalted butter, softened
- 4 cups (480 g) powdered sugar
- 2 tsp vanilla extract
For the Berry Glaze and Decoration
- ½ cup (120 ml) strawberry or raspberry jam
- 2 tbsp water
- 1 tsp lemon juice
- Red velvet crumbs (from cake trimming)
- Dark chocolate chips
- Extra frosting for piping
How to Make Red Velvet Cheesecake Layer Cake Recipe
Step 1: Prepare the Chocolate Cookie Crust
- Mix the chocolate cookie crumbs with melted butter until it resembles wet sand.
- Press the mixture evenly into the bottom of a 9-inch springform pan.
- Bake in a preheated oven at 350°F (175°C) for 10 minutes. Allow it to cool completely before adding the cheesecake layer.
Step 2: Bake the Red Velvet Cake Layers
- Preheat the oven to 350°F (175°C). Grease and line two 9-inch round cake pans.
- In a large bowl, whisk together flour, cocoa powder, baking soda, baking powder, and salt.
- In another bowl, blend sugar, vegetable oil, eggs, buttermilk, white vinegar, vanilla extract, and red gel food coloring until smooth.
- Gradually combine wet ingredients with dry ingredients; mix just until smooth to avoid overmixing.
- Divide batter evenly between pans; bake for 25-30 minutes or until a toothpick inserted comes out clean. Let layers cool completely.
Step 3: Prepare the Cheesecake Layer
- Beat softened cream cheese and sugar until smooth and creamy in a medium bowl.
- Add eggs one at a time, beating well after each addition.
- Mix in vanilla extract and sour cream or heavy cream until fully incorporated.
- Pour cheesecake batter over cooled cookie crust or into prepared pan if not using crust.
- Bake at 325°F (160°C) for 40-45 minutes until set but slightly jiggly in center. Cool fully before chilling in refrigerator.
Step 4: Assemble the Cake
- Place one red velvet cake layer on your serving plate; spread a thin layer of cream cheese frosting on top.
- Carefully add the chilled cheesecake layer on top; spread a light layer of frosting on cheesecake to help stick next layer.
- Add second red velvet layer on top; frost entire cake with remaining cream cheese frosting.
Step 5: Add Finishing Touches
- Warm strawberry or raspberry jam with water and lemon juice over low heat until pourable.
- Let glaze cool slightly before gently pouring over top of cake; allow it to drip down sides.
- Decorate using piped cream cheese frosting, red velvet crumbs from trimming, and scatter dark chocolate chips on top for added texture.
Enjoy making this beautiful Red Velvet Cheesecake Layer Cake Recipe, guaranteed to be a delightful centerpiece at any gathering!
How to Serve Red Velvet Cheesecake Layer Cake Recipe
Serving this Red Velvet Cheesecake Layer Cake is all about presentation and pairing it with complementary flavors. Here are some delightful ways to serve this decadent dessert at your next gathering.
For a Festive Touch
- Garnish with Fresh Berries: Top each slice with fresh strawberries or raspberries for a burst of color and flavor.
- Add Whipped Cream: Serve alongside dollops of whipped cream for added creaminess and a light touch.
With Beverages
- Pair with Coffee: The rich taste of coffee enhances the chocolate notes in the cake.
- Serve with Tea: A cup of herbal or black tea can balance out the sweetness.
For Special Occasions
- Decorate for Birthdays: Use colorful sprinkles or themed decorations to make it festive.
- Anniversary Treat: Present the cake on a beautiful serving platter for an elegant look.
How to Perfect Red Velvet Cheesecake Layer Cake Recipe
To ensure your Red Velvet Cheesecake Layer Cake turns out perfect every time, follow these helpful tips.
- Use Room Temperature Ingredients: Ensure that your cream cheese, eggs, and butter are at room temperature for better mixing and texture.
- Don’t Overmix the Batter: Mix until just combined to keep your cake fluffy; overmixing can lead to a dense texture.
- Check Oven Temperature: Use an oven thermometer to confirm that your oven is accurately calibrated for even baking.
- Cool Layers Completely: Let both the cake and cheesecake layers cool fully before stacking to prevent melting the frosting.
- Chill Before Serving: Allow the assembled cake to chill in the refrigerator for at least an hour; this helps set the layers and makes slicing easier.
Best Side Dishes for Red Velvet Cheesecake Layer Cake Recipe
Pairing side dishes with your Red Velvet Cheesecake Layer Cake can enhance its flavor profile. Here are some fantastic options:
- Fresh Fruit Salad: A mix of seasonal fruits adds freshness and balances the richness of the cake.
- Vanilla Ice Cream: The creamy vanilla flavor complements the chocolate notes beautifully; serve it as a scoop on the side.
- Chocolate Mousse: This light, airy dessert provides a delightful contrast in texture while enhancing chocolate flavors.
- Nutty Granola Parfait: Layer granola, yogurt, and fruit in small glasses for a crunchy counterpart to the soft cake.
- Coffee Affogato: Pour hot espresso over vanilla ice cream for a warm-cold combination that pairs well with dessert.
- Pecan Pie Bites: These bite-sized treats offer a nutty sweetness that contrasts nicely with the cheesecake layers.
Common Mistakes to Avoid
When making a Red Velvet Cheesecake Layer Cake, certain common mistakes can impact the final result. Here are key errors to watch out for:
- Using cold ingredients: Always ensure your cream cheese and eggs are at room temperature. This helps achieve a smoother batter and a creamier cheesecake.
- Overmixing the batter: When combining wet and dry ingredients, mix just until combined to avoid a dense cake. Gentle folding is key for fluffy layers.
- Not allowing layers to cool completely: If the cake layers or cheesecake are not fully cooled, they may collapse or not set properly. Patience is essential!
- Skipping the chilling time: Chilling the cheesecake is crucial for proper texture. Allow it to chill in the fridge for at least 4 hours before assembling.
- Ignoring oven temperature variations: Ovens can vary in temperature. Always check doneness with a toothpick, and consider investing in an oven thermometer.
Storage & Reheating Instructions
Refrigerator Storage
- Store leftover cake in an airtight container.
- The Red Velvet Cheesecake Layer Cake will last in the refrigerator for up to 5 days.
Freezing Red Velvet Cheesecake Layer Cake Recipe
- Wrap individual slices or the whole cake tightly in plastic wrap and then foil.
- It can be frozen for up to 3 months for optimal freshness.
Reheating Red Velvet Cheesecake Layer Cake Recipe
- Oven: Preheat your oven to 350°F (175°C). Place slices on a baking sheet and cover with foil. Heat for about 10-15 minutes until warmed through.
- Microwave: Use medium power and heat slices for 20-30 seconds at a time, checking frequently to avoid overheating.
- Stovetop: On low heat, place slices in a covered pan with a splash of water underneath. Heat gently until warmed.
Frequently Asked Questions
Here are some common questions about the Red Velvet Cheesecake Layer Cake Recipe that might help you.
What is the best way to color the cake?
Using red gel food coloring provides vibrant color without adding too much liquid. Start with one tablespoon and adjust based on your desired shade.
Can I use different kinds of frosting?
Absolutely! While cream cheese frosting complements this cake perfectly, you could also try whipped cream or a chocolate ganache for variety.
How do I prevent my cheesecake from cracking?
Baking your cheesecake in a water bath helps maintain moisture levels and prevents cracking. Just be sure to wrap your pan in foil securely!
How long should I chill the cheesecake layer?
For best results, chill the cheesecake layer for at least 4 hours, or overnight if possible, before assembling your cake.
Can I customize this recipe?
Yes! You can add flavors like lemon zest or almond extract to both the cake and cheesecake layers. Fresh fruit toppings can also enhance presentation and flavor!
Final Thoughts
The Red Velvet Cheesecake Layer Cake is an indulgent dessert that beautifully merges rich flavors with stunning visuals. Its versatility allows you to customize it with various toppings or flavors, making it perfect for any occasion. Don’t hesitate to try this recipe; it’s sure to impress friends and family alike!
Did You Enjoy Making This Recipe? Please rate this recipe with ⭐⭐⭐⭐⭐ or leave a comment.
📖 Recipe Card
Print
Red Velvet Cheesecake Layer Cake
- Total Time: 1 hour 50 minutes
- Yield: Serves approximately 12 slices 1x
Description
Indulge in the luxurious layers of our Red Velvet Cheesecake Layer Cake Recipe, a perfect blend of rich cheesecake and the iconic flavor of red velvet cake. This stunning dessert is ideal for birthdays, anniversaries, or any celebration, guaranteed to impress your guests and satisfy your sweet cravings. With its moist layers and creamy center, this cake not only tastes divine but also serves as a beautiful centerpiece on any dessert table. Each slice offers a delightful combination of textures and flavors, making it a favorite for all occasions.
Ingredients
- 2 cups (200 g) chocolate cookie crumbs (Oreo or similar, without filling)
- ½ cup (115 g) unsalted butter, melted
- 2 ½ cups (315 g) all-purpose flour
- 1 ½ cups (300 g) sugar
- 2 tbsp cocoa powder
- 1 tsp baking soda
- 1 tsp baking powder
- 1 tsp salt
- 1 ½ cups (360 ml) buttermilk (or milk + 1 tbsp vinegar)
- 1 cup (240 ml) vegetable oil
- 2 large eggs
- 2 tsp vanilla extract
- 1 tsp white vinegar
- 1–2 tbsp red gel food coloring
- 16 oz (450 g) cream cheese, softened
- ½ cup (100 g) sugar
- 2 large eggs
- 1 tsp vanilla extract
- ½ cup (120 ml) sour cream or heavy cream
- ½ cup (120 ml) strawberry or raspberry jam
- 2 tbsp water
- 1 tsp lemon juice
- Red velvet crumbs (from cake trimming)
- Dark chocolate chips
- Extra frosting for piping
Instructions
- Preheat your oven to 350°F (175°C). Prepare a springform pan by greasing it.
- For the chocolate cookie crust, mix cookie crumbs with melted butter; press into the bottom of the pan and bake for 10 minutes.
- For the red velvet cake layers, whisk flour, cocoa powder, baking soda, baking powder, and salt in one bowl. In another bowl, blend sugar, oil, eggs, buttermilk, vinegar, vanilla extract, and food coloring until smooth. Combine wet and dry ingredients just until mixed.
- Divide batter into prepared pans and bake for 25–30 minutes until toothpick comes out clean; cool completely.
- For the cheesecake layer, beat softened cream cheese with sugar until smooth; add eggs one at a time along with vanilla and sour cream. Pour over cooled crust; bake at 325°F (160°C) for 40–45 minutes until set but slightly jiggly in center.
- Assemble by layering the red velvet cakes with frosting and cheesecake layer in between.
- Prep Time: 30 minutes
- Cook Time: 80 minutes
- Category: Dessert
- Method: Baking
- Cuisine: American
Nutrition
- Serving Size: 1 serving
- Calories: 480
- Sugar: 36g
- Sodium: 320mg
- Fat: 28g
- Saturated Fat: 16g
- Unsaturated Fat: 12g
- Trans Fat: 0g
- Carbohydrates: 56g
- Fiber: 2g
- Protein: 6g
- Cholesterol: 85mg