You’ll love making Piped Chocolate Butter Cookies for any occasion! These delightful cookies have a rich chocolate flavor and a melt-in-your-mouth texture that’s perfect for holiday gatherings, tea parties, or just a sweet treat at home. With only a few basic ingredients and simple steps, you can create these beautiful piped cookies that are sure to impress your family and friends.
Jump to:
- Why You’ll Love This Recipe
- Tools and Preparation
- Essential Tools and Equipment
- Importance of Each Tool
- Ingredients
- How to Make Piped Chocolate Butter Cookies
- Step 1: Prepare Your Baking Sheet
- Step 2: Line Your Baking Sheets
- Step 3: Cream Butter and Sugar
- Step 4: Add Dry Ingredients
- Step 5: Prepare Espresso Mixture
- Step 6: Pipe the Dough
- Step 7: Chill Before Baking
- Step 8: Preheat Your Oven
- Step 9: Bake Cookies
- Step 10: Cool Cookies
- Step 11: Melt Chocolate
- Step 12: Store Cookies
- How to Serve Piped Chocolate Butter Cookies
- With a Hot Beverage
- As Dessert Platters
- For Celebrations
- How to Perfect Piped Chocolate Butter Cookies
- Best Side Dishes for Piped Chocolate Butter Cookies
- Common Mistakes to Avoid
- Storage & Reheating Instructions
- Refrigerator Storage
- Freezing Piped Chocolate Butter Cookies
- Reheating Piped Chocolate Butter Cookies
- Frequently Asked Questions
- Can I use margarine instead of butter?
- How do I prevent my cookies from spreading too much?
- Can I add nuts or chocolate chips?
- What should I do if my dough is too thick?
- How long do these cookies stay fresh?
- Final Thoughts
- 📖 Recipe Card
Why You’ll Love This Recipe
- Easy to Make: This recipe requires just 9 basic ingredients and minimal equipment.
- Rich Flavor: The combination of cocoa powder and espresso creates a deep chocolate taste.
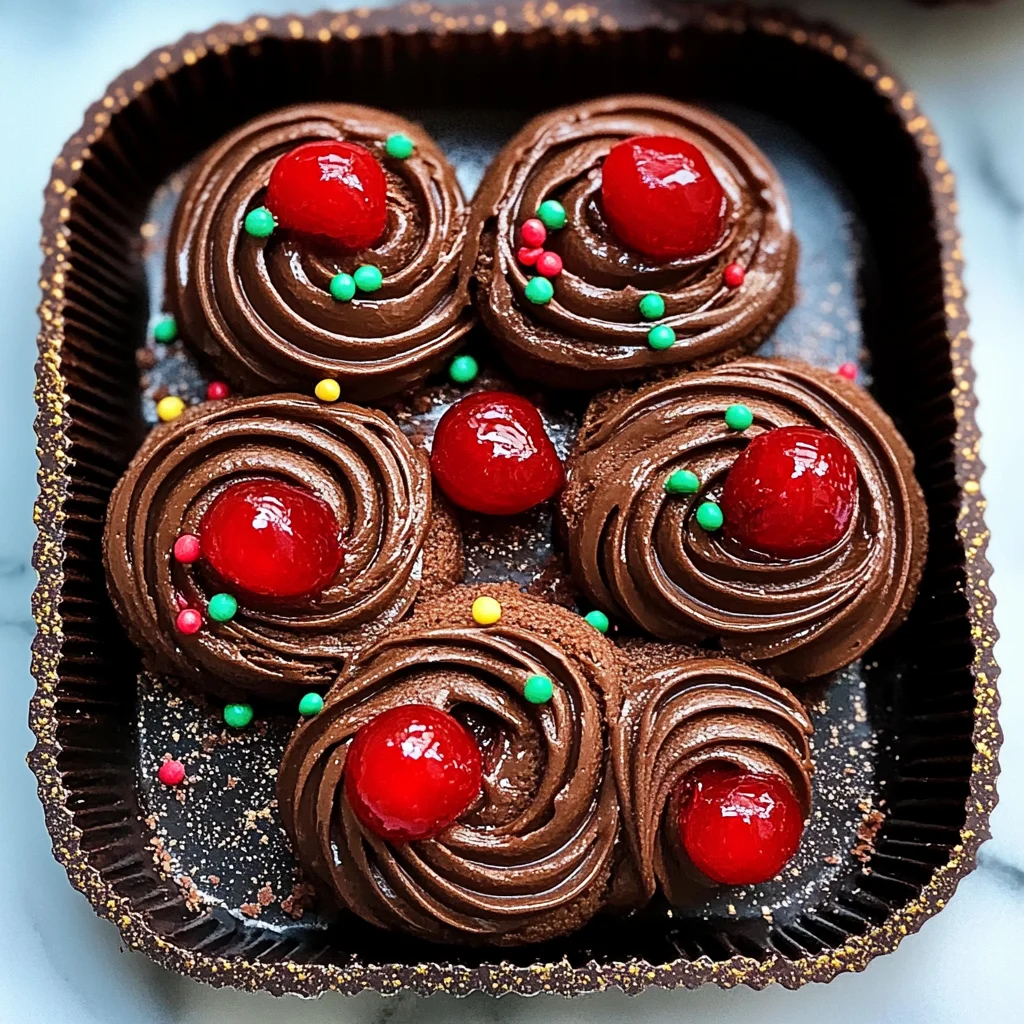
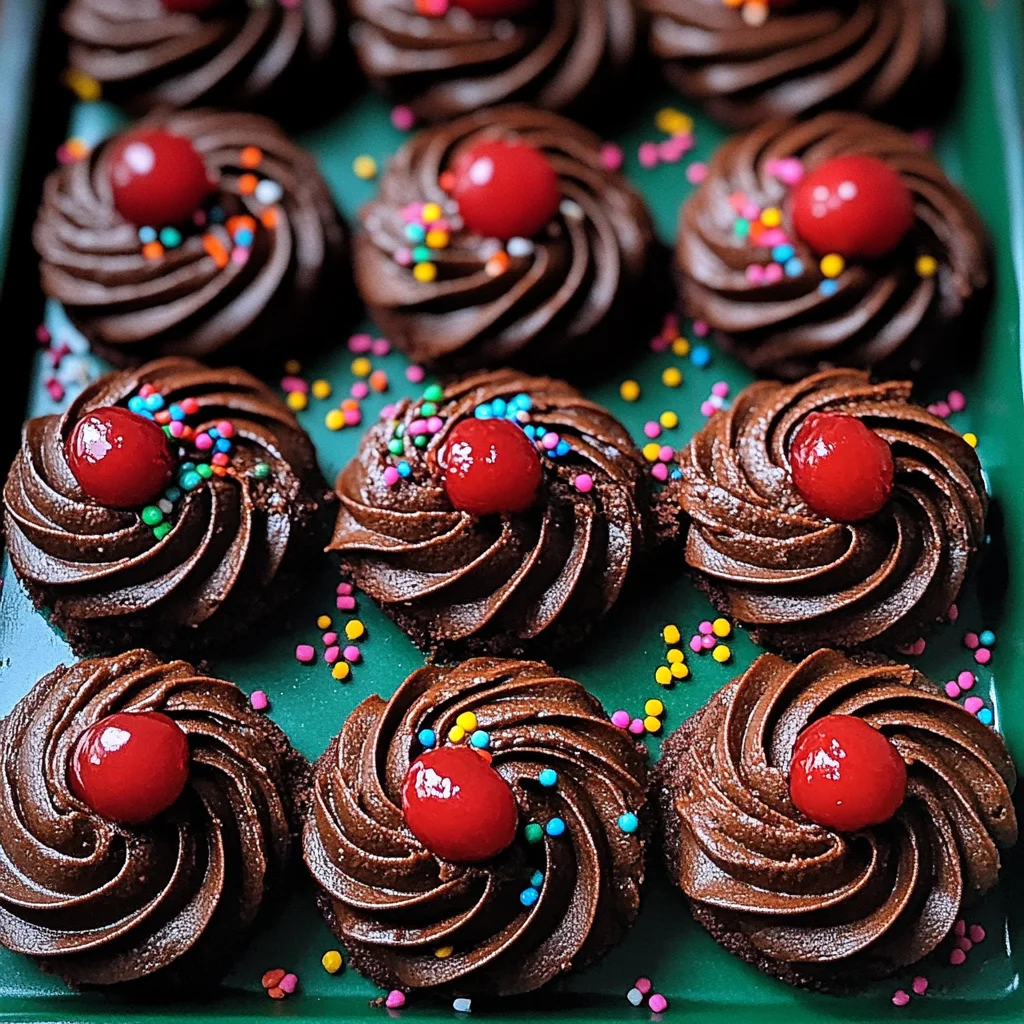
- Versatile Decorations: Top them with maraschino cherries or colorful sprinkles for a festive touch.
- Perfect Texture: With no leavening agents, these cookies have a shortbread-like consistency that melts in your mouth.
- Great for Sharing: These cookies can be easily packaged for gifts or cookie exchanges.
Tools and Preparation
Before you start baking, it’s essential to gather your tools and prepare your workspace. Having everything ready will make the process smooth and enjoyable.
Essential Tools and Equipment
- Large mixing bowl
- Handheld mixer or stand mixer
- Piping bag with large piping tip
- Baking sheets
- Parchment paper or silicone baking mats
Importance of Each Tool
- Mixing Bowl: A large bowl allows you to mix all your ingredients without making a mess.
- Handheld Mixer or Stand Mixer: These tools save time and ensure the butter is creamed perfectly for the best texture.
- Piping Bag: The piping bag helps you shape the cookies beautifully, ensuring uniformity in size.
- Baking Sheets: Proper baking sheets help distribute heat evenly for consistent baking.
Ingredients
You need just 9 basic ingredients and a large piping tip to make these melt-in-your-mouth chocolate butter cookies. There’s no leavening, so the texture is similar to shortbread cookies. Review recipe Notes before beginning, and I strongly recommend chilling the piped cookies for at least 20–30 minutes before baking.
Ingredients:
– 1 cup (16 Tbsp; 226g) unsalted butter, softened to room temperature
– 3/4 cup (150g) granulated sugar
– 1 large egg, at room temperature
– 1 and 1/2 teaspoons pure vanilla extract
– 2 cups (250g) all-purpose flour, spooned & leveled
– 1/3 cup (27g) natural or dutch-process unsweetened cocoa powder
– 1/4 teaspoon salt
– 2 Tablespoons (30ml) milk, warm
– 1 teaspoon espresso powder
– 4 ounces (113g) semi-sweet chocolate, finely chopped
– maraschino cherries
– sprinkles or coarse sugar
How to Make Piped Chocolate Butter Cookies
Step 1: Prepare Your Baking Sheet
Make room in your refrigerator for a baking sheet so the shaped cookies can chill for 20–30 minutes. Without chilling, the piped cookies will overspread. If you chill the dough prior to shaping, it will be too cold/stiff to pipe.
Step 2: Line Your Baking Sheets
Line 2–3 large baking sheets with parchment paper or silicone baking mats. If unlined, do not grease the pan.
Step 3: Cream Butter and Sugar
In a large bowl, using a handheld mixer or stand mixer fitted with a paddle attachment, beat the butter on medium-high speed until very soft and creamy, about 2 minutes. Add granulated sugar and beat until smooth, another 2 minutes. Then add the egg and vanilla; beat until combined.
Step 4: Add Dry Ingredients
On low speed, mix in flour, cocoa powder, and salt until completely combined.
Step 5: Prepare Espresso Mixture
Warm the milk to about 150°F (66°C)—about 20 seconds in the microwave—then mix in espresso powder until dissolved. Add this mixture to your dough while beating on medium speed until creamy but still thick.
Step 6: Pipe the Dough
Add your large piping tip to the piping bag. Spoon some dough into it and pipe a swirl or line on the baking sheet. Space them about 3 inches apart. If needed, add more milk if dough is too thick.
Step 7: Chill Before Baking
Transfer the baking sheet with piped cookies to the refrigerator for chilling for at least 20–30 minutes.
Step 8: Preheat Your Oven
Meanwhile, preheat your oven to 350°F (177°C).
Step 9: Bake Cookies
Bake chilled cookies for 12–15 minutes or until edges seem set but they retain their shape. Smaller cookies may take closer to 12 minutes.
Step 10: Cool Cookies
Remove from oven and let cool on the baking sheet for about 5 minutes before transferring them to a wire rack to cool completely.
Step 11: Melt Chocolate
Melt chopped chocolate either in a double boiler or microwave in increments of 20 seconds until smooth. Dip cooled cookies in chocolate if desired.
Step 12: Store Cookies
Allow chocolate to set completely at room temperature before storing them in an airtight container at room temperature for up to four days or in the refrigerator for one week.
Enjoy your deliciously crafted Piped Chocolate Butter Cookies!
How to Serve Piped Chocolate Butter Cookies
Piped chocolate butter cookies are a delightful treat that can elevate any occasion. Whether you’re hosting a gathering or enjoying an afternoon snack, here are some creative serving suggestions.
With a Hot Beverage
- Coffee: Pair these cookies with a rich cup of coffee for a perfect balance of flavors.
- Hot Chocolate: Enjoy them alongside a warm mug of hot chocolate for an indulgent treat.
- Tea: A light herbal or chai tea complements the sweetness of the cookies beautifully.
As Dessert Platters
- Cookie Assortments: Combine these cookies with other baked goods for a diverse dessert platter.
- Chocolate Dipping Station: Set up melted chocolate and toppings like sprinkles for guests to dip their cookies.
For Celebrations
- Gift Boxes: Package them in decorative boxes to offer as gifts during holidays or special occasions.
- Party Favors: Present these cookies as sweet party favors at birthdays or events.
How to Perfect Piped Chocolate Butter Cookies
To achieve the best results with your piped chocolate butter cookies, follow these helpful tips.
- Chill the Dough: Ensure you chill the shaped cookies for 20-30 minutes before baking to prevent overspreading.
- Use Room Temperature Ingredients: Make sure your butter and egg are at room temperature for better mixing and texture.
- Choose the Right Piping Tip: A large piping tip will help create beautiful swirls without too much effort.
- Monitor Oven Temperature: Use an oven thermometer to ensure accurate baking temperatures for consistent results.
- Don’t Overmix the Dough: Mix just until ingredients are combined to maintain a tender cookie texture.
Best Side Dishes for Piped Chocolate Butter Cookies
These delicious cookies pair well with various side dishes, enhancing their enjoyment. Here are some great options to consider:
- Fresh Fruit Salad: A vibrant fruit salad adds freshness and balances the richness of the cookies.
- Gelato or Ice Cream: Serve with a scoop of your favorite gelato or ice cream for a decadent dessert experience.
- Cheese Platter: Include soft cheeses like brie or goat cheese to contrast the sweetness of the cookies.
- Nuts and Dried Fruits: A mix of nuts and dried fruits provides a crunchy texture that complements the soft cookies.
- Yogurt Parfait: Layer yogurt, granola, and berries in a glass for a creamy side that contrasts nicely with the cookie’s crunch.
- Chocolate Fondue: Create an interactive dessert experience by serving with warm chocolate fondue for dipping.
Common Mistakes to Avoid
Making Piped Chocolate Butter Cookies can be a delightful experience, but it’s easy to make mistakes that affect your results. Here are some common pitfalls to avoid:
- Not Chilling the Dough: Failing to chill the piped cookies before baking can lead to overspreading. Always refrigerate shaped cookies for 20–30 minutes.
- Incorrect Butter Temperature: Using butter that is too cold or too melted can hinder the creaming process. Ensure your butter is softened to room temperature for best results.
- Skipping Espresso Powder: Omitting espresso powder may dull the chocolate flavor in your cookies. Consider adding it for a richer taste.
- Overmixing the Dough: Mixing too much after adding flour can create tough cookies. Mix until just combined for a tender texture.
- Using Wrong Piping Tip: Choosing a small piping tip can make it hard to pipe the dough. Use a large tip for easier shaping and better results.

Storage & Reheating Instructions
Refrigerator Storage
- Store in an airtight container for up to 4 days.
- Keep cookies without chocolate or cherries fresh for up to 1 week.
Freezing Piped Chocolate Butter Cookies
- Freeze cookies in an airtight container for up to 3 months.
- Layer with parchment paper between layers to prevent sticking.
Reheating Piped Chocolate Butter Cookies
- Oven: Preheat to 300°F (150°C) and heat for about 5-7 minutes until warm.
- Microwave: Heat individual cookies on a microwave-safe plate for about 10-15 seconds.
- Stovetop: Place in a covered pan on low heat for a few minutes, keeping an eye on them.
Frequently Asked Questions
Here are some common questions about making Piped Chocolate Butter Cookies:
Can I use margarine instead of butter?
You can substitute margarine, but it may alter the cookie’s texture and flavor slightly. Unsalted butter is recommended for best taste.
How do I prevent my cookies from spreading too much?
Make sure to chill the piped cookies before baking and avoid adding too much milk during mixing.
Can I add nuts or chocolate chips?
Yes! Feel free to customize your Piped Chocolate Butter Cookies by adding nuts or chocolate chips as desired.
What should I do if my dough is too thick?
If your dough is too thick to pipe, gradually add small amounts of warm milk until you reach a creamy consistency.
How long do these cookies stay fresh?
With chocolate or cherries, they last about 4 days at room temperature; without those toppings, they remain fresh for up to 1 week.
Final Thoughts
Piped Chocolate Butter Cookies are not only delicious but also versatile. They make an excellent treat for any occasion and can be customized with various toppings or flavors. Give this recipe a try, and enjoy the melt-in-your-mouth goodness!
Did You Enjoy Making This Recipe? Please rate this recipe with ⭐⭐⭐⭐⭐ or leave a comment.
📖 Recipe Card
Print
Piped Chocolate Butter Cookies
- Total Time: 35 minutes
- Yield: Approximately 24 cookies 1x
Description
Indulge in the delightful experience of making Piped Chocolate Butter Cookies! These cookies combine a rich chocolate flavor with a melt-in-your-mouth texture, making them perfect for holiday gatherings, tea parties, or just a sweet treat at home. With only nine basic ingredients and straightforward steps, you’ll impress family and friends with these beautiful piped delights. Their versatility allows for various decorations, from maraschino cherries to colorful sprinkles, adding a festive touch. Not only are they easy to package for gifts or cookie exchanges, but they also offer a luxurious taste that everyone will love!
Ingredients
- 1 cup unsalted butter (226g), softened
- 3/4 cup granulated sugar (150g)
- 1 large egg
- 1 and 1/2 teaspoons pure vanilla extract
- 2 cups all-purpose flour (250g)
- 1/3 cup unsweetened cocoa powder (27g)
- 1/4 teaspoon salt
- 2 Tablespoons warm milk (30ml)
- 1 teaspoon espresso powder
Instructions
- Prepare a baking sheet by making space in the refrigerator for chilling after piping.
- Line baking sheets with parchment paper.
- Cream softened butter until smooth; add sugar and mix until well combined.
- Incorporate the egg and vanilla until fully blended.
- Gradually mix in flour, cocoa powder, and salt until combined.
- Warm milk; dissolve espresso powder and add to the dough while mixing on medium speed.
- Pipe dough onto the prepared sheets and chill for 20–30 minutes.
- Preheat oven to 350°F (177°C) while chilling.
- Bake cookies for 12–15 minutes or until edges are set.
- Cool on wire racks before dipping in melted chocolate if desired.
- Prep Time: 20 minutes
- Cook Time: 15 minutes
- Category: Dessert
- Method: Baking
- Cuisine: American
Nutrition
- Serving Size: 1 serving
- Calories: 145
- Sugar: 7g
- Sodium: 45mg
- Fat: 9g
- Saturated Fat: 5g
- Unsaturated Fat: 4g
- Trans Fat: 0g
- Carbohydrates: 16g
- Fiber: 1g
- Protein: 2g
- Cholesterol: 20mg