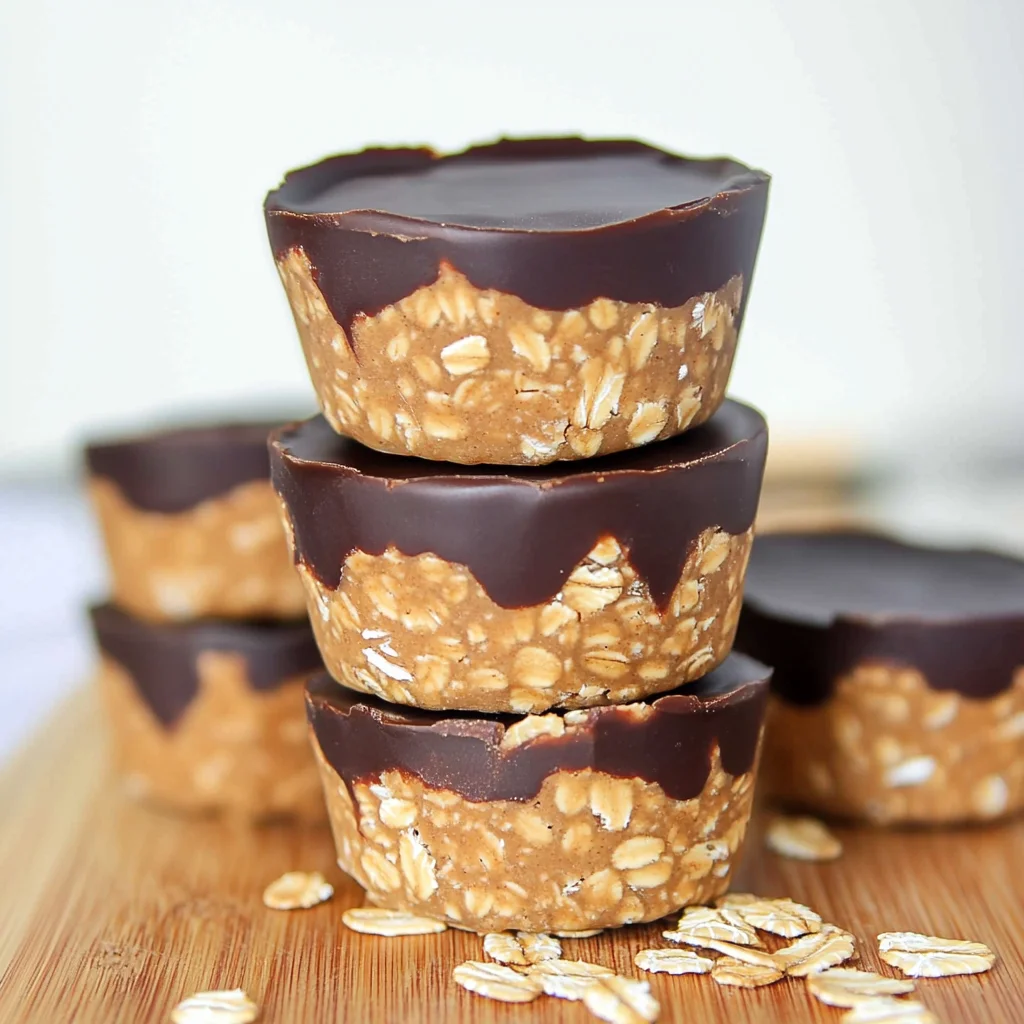
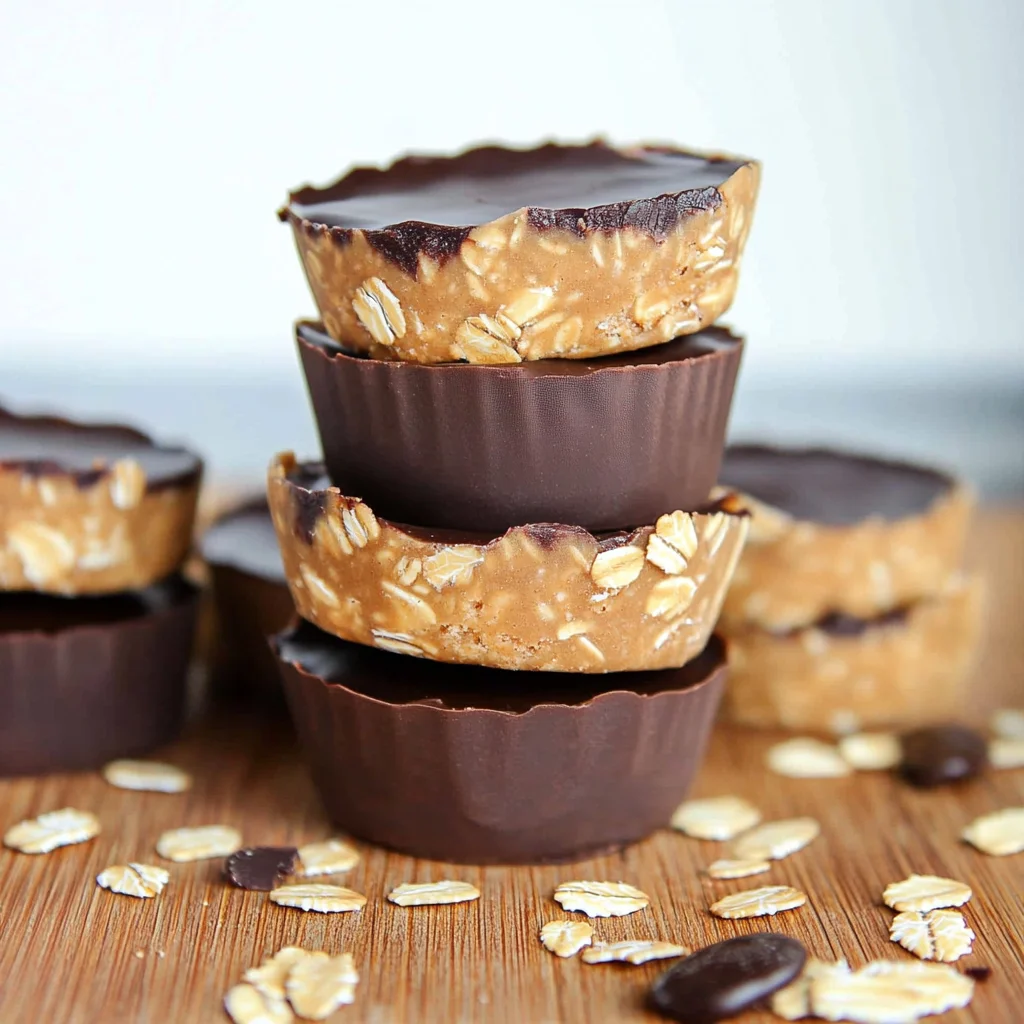
A creamy and delicious treat, No Bake Peanut Butter Oat Cups are perfect for those who crave a sweet yet healthy snack. With just a few simple ingredients, you can whip up these delightful cups in no time. They are great for lunchboxes, after-school snacks, or as a dessert to satisfy your sweet tooth without the guilt. The combination of peanut butter and chocolate makes them irresistible, ensuring they’ll be a hit with both kids and adults alike.
Jump to:
- Why You’ll Love This Recipe
- Tools and Preparation
- Essential Tools and Equipment
- Importance of Each Tool
- Ingredients
- For Garnish
- How to Make No Bake Peanut Butter Oat Cups
- Step 1: Combine Peanut Butter and Maple Syrup
- Step 2: Add Oat Flour
- Step 3: Prepare Muffin Pan
- Step 4: Scoop Mixture into Muffin Pan
- Step 5: Melt Chocolate
- Step 6: Pour Chocolate Layer
- Step 7: Refrigerate Until Set
- How to Serve No Bake Peanut Butter Oat Cups
- As a Quick Snack
- With Fresh Fruit
- Drizzled with Honey
- On a Charcuterie Board
- Crumbled Over Yogurt
- With Ice Cream
- How to Perfect No Bake Peanut Butter Oat Cups
- Best Side Dishes for No Bake Peanut Butter Oat Cups
- Common Mistakes to Avoid
- Storage & Reheating Instructions
- Refrigerator Storage
- Freezing No Bake Peanut Butter Oat Cups
- Reheating No Bake Peanut Butter Oat Cups
- Frequently Asked Questions
- Can I use crunchy peanut butter for No Bake Peanut Butter Oat Cups?
- How do I customize my No Bake Peanut Butter Oat Cups?
- Can I make these No Bake Peanut Butter Oat Cups vegan?
- What’s the best way to cut these cups if I use a baking dish instead of muffin tins?
- Final Thoughts
- 📖 Recipe Card
Why You’ll Love This Recipe
- Quick and Easy Preparation: With just 10 minutes of prep time, you can have these treats ready to set in the fridge.
- No Baking Required: These cups are made without turning on the oven, making them ideal for hot days or when you want to save time.
- Family-Friendly Ingredients: Made with wholesome ingredients like peanut butter and oat flour, these cups are nutritious and delicious.
- Versatile Flavor Options: Feel free to customize your cups by adding nuts, seeds, or different types of chocolate.
- Perfect for Meal Prep: Store them in an airtight container for up to five days, making them a great grab-and-go snack.
Tools and Preparation
Before getting started on your No Bake Peanut Butter Oat Cups, gather your tools and prepare your workspace. Having everything ready will make the process smoother and more enjoyable.
Essential Tools and Equipment
- Microwave-safe bowl
- Muffin pan or silicone muffin pan
- Mixing spoon
- Measuring cups
- Food processor (if making oat flour)
Importance of Each Tool
- Microwave-safe bowl: Allows you to easily melt the peanut butter and maple syrup together without any mess.
- Muffin pan or silicone muffin pan: Ensures easy removal of the cups once they are set. Silicone pans are especially handy for this recipe.
- Food processor: If using rolled oats to make oat flour, this tool makes it quick and easy to achieve the right texture.
Ingredients
A creamy peanut butter oat layer topped with melted chocolate to make a tasty peanut butter chocolate treat that your whole family will love.
Ingredients:
– 1.5 cups peanut butter
– 1.5 cups oat flour (Rolled oats processed finely in a food processor)
– 1/4 cup maple syrup
– 1 cup chocolate chips
– 1 tsp coconut oil (optional)
For Garnish
- Flaky salt or mini chocolate chips (optional)

How to Make No Bake Peanut Butter Oat Cups
Step 1: Combine Peanut Butter and Maple Syrup
Begin by adding your peanut butter and maple syrup into a medium-sized microwave-safe bowl.
1. Microwave for 40-60 seconds until warmed.
2. Stir thoroughly until completely combined.
Step 2: Add Oat Flour
Slowly add the oat flour to the bowl.
1. Mix well; it should take some effort.
2. If too dry, add more maple syrup or peanut butter gradually until desired consistency is reached.
Step 3: Prepare Muffin Pan
Prepare your muffin pan by lining it with cupcake liners or using a silicone muffin pan for easier removal.
1. Note that these treats will be difficult to remove from traditional pans without liners.
Step 4: Scoop Mixture into Muffin Pan
Scoop the peanut butter oat mixture evenly into each muffin hole.
1. Press down firmly with your fingers so that each cup holds its shape.
Step 5: Melt Chocolate
In a small microwave-safe bowl, combine the chocolate chips and optional coconut oil.
1. Heat in 30-second increments until smooth, stirring in between each interval.
Step 6: Pour Chocolate Layer
Pour a layer of melted chocolate over each filled muffin hole.
1. Use the back of a spoon to smooth out the tops.
2. Optional: Sprinkle flaky salt or mini chocolate chips on top before the chocolate hardens.
Step 7: Refrigerate Until Set
Refrigerate your cups for 2-3 hours until completely set.
1. Carefully remove from the muffin pan or liners after they have hardened.
2. Store in an airtight container in the refrigerator for up to five days for best freshness.
These No Bake Peanut Butter Oat Cups are not only simple but also provide a delightful treat without any baking involved! Enjoy them as part of your healthy snacking routine!
How to Serve No Bake Peanut Butter Oat Cups
These No Bake Peanut Butter Oat Cups are versatile and can be enjoyed in a variety of ways. Whether you’re looking for a quick snack or a dessert, these cups can fit any occasion. Here are some fun serving suggestions.
As a Quick Snack
- These oat cups make for an excellent mid-afternoon snack to keep your energy levels high and your cravings satisfied.
With Fresh Fruit
- Pair your oat cups with fresh fruits like bananas or strawberries for added texture and nutrition. The sweetness of the fruit complements the peanut butter flavor perfectly.
Drizzled with Honey
- A light drizzle of honey over the top can enhance the sweetness without overpowering the original flavors. This is especially great if you prefer a sweeter treat.
On a Charcuterie Board
- Add these oat cups to your next charcuterie board. They provide a unique, healthy option alongside cheeses, nuts, and other snacks.
Crumbled Over Yogurt
- Crumble your No Bake Peanut Butter Oat Cups on top of yogurt for a delightful breakfast or snack. This adds crunch and richness to your parfait.
With Ice Cream
- For an indulgent dessert, serve these oat cups with a scoop of vanilla ice cream. The warm chocolate topping will melt slightly into the ice cream, creating a delicious combination.
How to Perfect No Bake Peanut Butter Oat Cups
Achieving the perfect No Bake Peanut Butter Oat Cups involves attention to detail during preparation. With these tips, you can ensure your treats come out just right.
- Use Natural Peanut Butter: For the best flavor and consistency, opt for natural peanut butter without added sugars or oils. This will create a creamier texture.
- Adjust Sweetness: Feel free to adjust the amount of maple syrup based on your taste preference. Start with less and add more if needed to prevent overly sweet cups.
- Ensure Proper Mixing: Make sure that the peanut butter and maple syrup are well combined before adding oat flour. This will help create a smoother mixture that molds well.
- Experiment with Mix-Ins: Consider adding nuts, seeds, or dried fruit into your mixture for extra flavor and texture. Just be mindful not to overload it.
- Chill Thoroughly: Allowing the cups to chill for 2-3 hours ensures they set properly. Cutting corners here may result in cups that fall apart too easily.
- Store Correctly: Keep them in an airtight container in the refrigerator to maintain freshness, as they contain perishable ingredients like maple syrup.
Best Side Dishes for No Bake Peanut Butter Oat Cups
To complement your No Bake Peanut Butter Oat Cups, consider serving them with some delicious side dishes that enhance their flavors and textures. Here are some tasty options:
- Fresh Fruit Salad: A mix of seasonal fruits provides refreshing sweetness that pairs nicely with the richness of the oat cups.
- Granola Parfait: Layer yogurt and granola with your oat cups for a satisfying breakfast or brunch option.
- Nutty Trail Mix: Combine nuts, seeds, and dried fruits for an easy-to-make trail mix that adds crunch.
- Vegetable Sticks with Hummus: Enjoy some crunchy veggies paired with hummus for a healthy contrast to the sweet treats.
- Cheese Platter: Offer assorted cheeses alongside your oat cups to provide balance between savory and sweet flavors.
- Chocolate-Covered Strawberries: These add an extra touch of indulgence while keeping things fruity.
- Homemade Smoothies: Blend up some smoothies using fruits and greens; they make a nutritious drink that complements dessert.
- Rice Cakes with Nut Butter: Top rice cakes with various nut butters—this keeps things simple and delicious alongside your treat!
Common Mistakes to Avoid
Making No Bake Peanut Butter Oat Cups can be easy, but there are a few common pitfalls to watch out for.
- Using the wrong type of peanut butter: Natural peanut butter may separate. Use a creamy variety that mixes well with the other ingredients.
- Not measuring oat flour accurately: Too much oat flour can dry out the mixture. Always measure carefully, ideally using a kitchen scale for precision.
- Skipping the refrigeration step: This step is crucial for setting the cups. Avoid this by ensuring you refrigerate them for at least 2-3 hours before enjoying.
- Overheating the chocolate: Melt chocolate in short bursts to prevent burning. Stir in between and remove it from the microwave while it’s still slightly chunky; it will melt completely with stirring.
- Neglecting to line the muffin pan: Without liners, these cups can stick. Always use cupcake liners or a silicone pan to make removal easy.
Storage & Reheating Instructions
Refrigerator Storage
- Store No Bake Peanut Butter Oat Cups in an airtight container.
- They will stay fresh for up to 5 days when refrigerated.
Freezing No Bake Peanut Butter Oat Cups
- Freezing time: You can freeze these cups for up to 3 months.
- Containers: Use freezer-safe containers or bags. Layer parchment paper between layers if stacking.
Reheating No Bake Peanut Butter Oat Cups
- Oven: Preheat your oven to a low temperature (about 300°F) and warm them for 5-10 minutes.
- Microwave: Heat on low power for about 10-15 seconds until slightly warm.
- Stovetop: Place them in a non-stick skillet over low heat, flipping occasionally until warmed through.

Frequently Asked Questions
Can I use crunchy peanut butter for No Bake Peanut Butter Oat Cups?
Yes, you can use crunchy peanut butter! It adds texture but may alter how well they hold together.
How do I customize my No Bake Peanut Butter Oat Cups?
You can add ingredients like chopped nuts, dried fruits, or different types of chocolate chips for added flavor and texture.
Can I make these No Bake Peanut Butter Oat Cups vegan?
Absolutely! Just ensure your chocolate chips are dairy-free and use maple syrup as your sweetener.
What’s the best way to cut these cups if I use a baking dish instead of muffin tins?
If using a baking dish, let them set in the refrigerator first. Use a sharp knife dipped in hot water to cut cleanly through the layers.
Final Thoughts
No Bake Peanut Butter Oat Cups are not only delicious but also easy to customize for any taste preference. Whether you enjoy them as a quick snack or dessert, they’re sure to satisfy your cravings. Try adding your favorite mix-ins or toppings for an even more delightful treat!
Did You Enjoy Making This Recipe? Please rate this recipe with ⭐⭐⭐⭐⭐ or leave a comment.
📖 Recipe Card
Print
No Bake Peanut Butter Oat Cups
- Total Time: 0 hours
- Yield: Makes approximately 12 cups 1x
Description
No Bake Peanut Butter Oat Cups are your go-to solution for a quick, healthy treat that satisfies your sweet cravings without the guilt. With a creamy peanut butter and oat base topped with rich chocolate, these delightful cups are perfect for lunchboxes, after-school snacks, or dessert. Whipping up in just 10 minutes with minimal effort, they use wholesome ingredients like peanut butter and oat flour, making them a nutritious choice the whole family will love. Customize these cups with nuts or seeds for added crunch and flavor. Chill them in the fridge to set and enjoy a deliciously satisfying snack anytime!
Ingredients
- 1.5 cups peanut butter
- 1.5 cups oat flour (processed from rolled oats)
- 1/4 cup maple syrup
- 1 cup chocolate chips
- 1 tsp coconut oil (optional)
Instructions
- In a microwave-safe bowl, combine peanut butter and maple syrup. Microwave for 40-60 seconds until warmed; stir until smooth.
- Gradually add oat flour to the mixture, stirring well until combined. Adjust consistency with more maple syrup or peanut butter if needed.
- Line muffin pan with cupcake liners or use a silicone muffin pan for easy removal. Scoop the mixture into each muffin hole and press down firmly.
- Melt chocolate chips and coconut oil in the microwave in short intervals, stirring until smooth.
- Pour melted chocolate over each filled muffin hole and smooth out with a spoon. Optionally sprinkle flaky salt or mini chocolate chips on top.
- Refrigerate for 2-3 hours until set before removing from the pan.
- Prep Time: 10 minutes
- Cook Time: None
- Category: Dessert
- Method: No Baking
- Cuisine: American
Nutrition
- Serving Size: 1 serving
- Calories: 210
- Sugar: 7g
- Sodium: 50mg
- Fat: 13g
- Saturated Fat: 3g
- Unsaturated Fat: 10g
- Trans Fat: 0g
- Carbohydrates: 18g
- Fiber: 2g
- Protein: 6g
- Cholesterol: 0mg