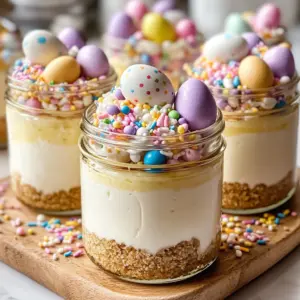
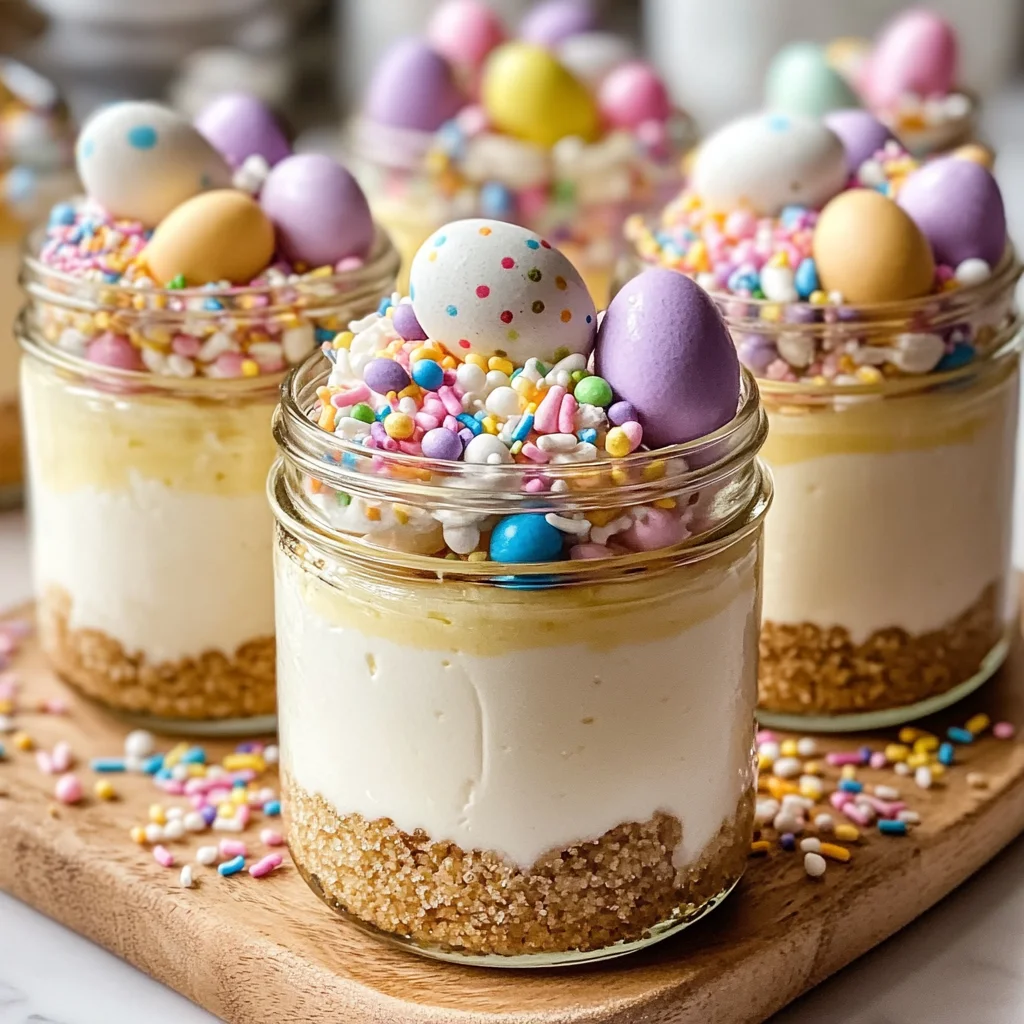
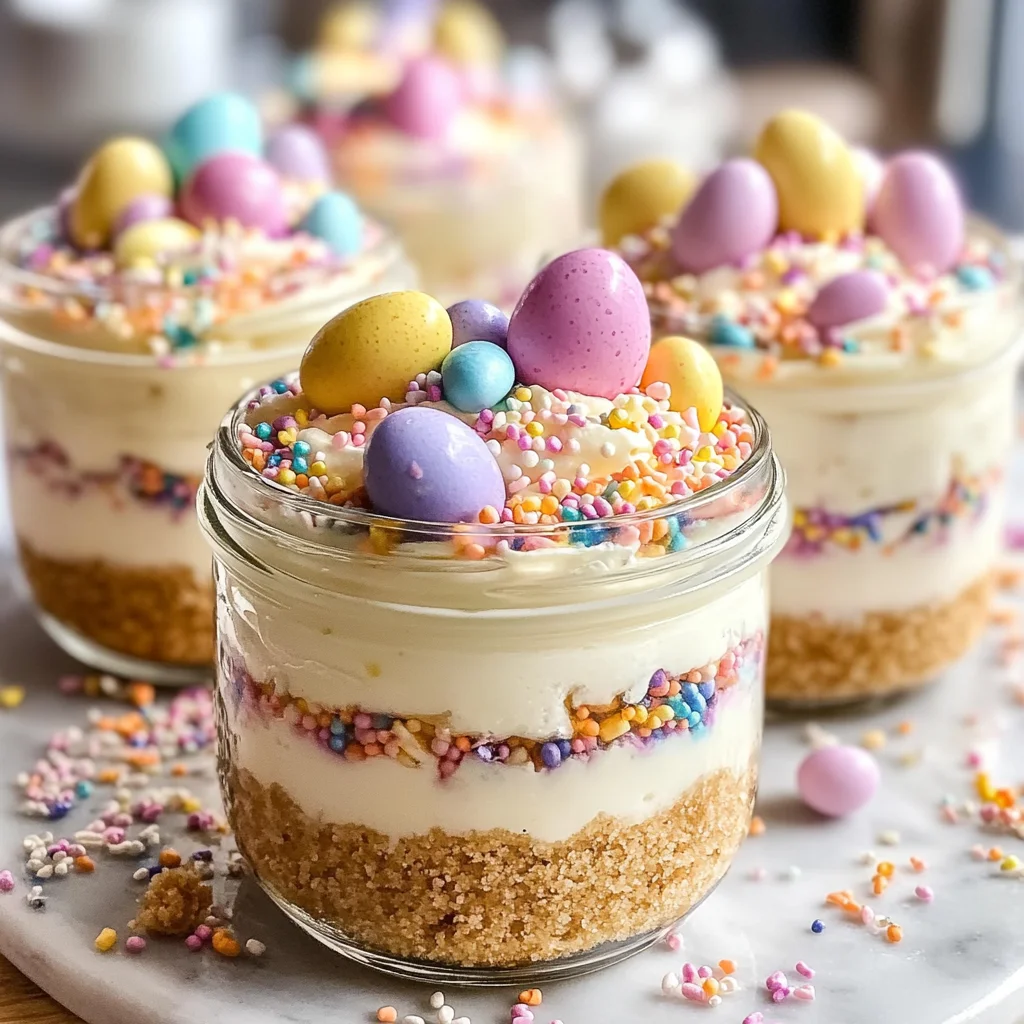
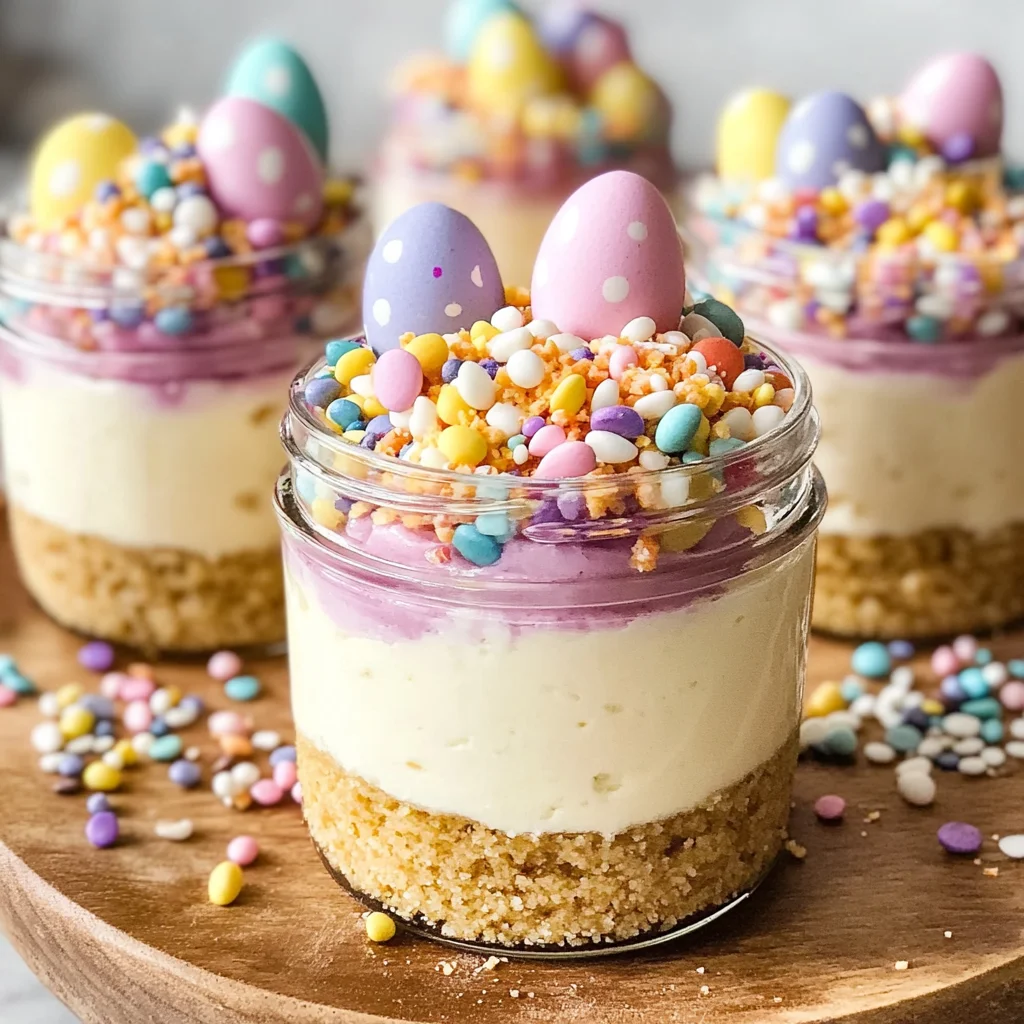
Mini Easter Cheesecake Jars – A Cute, No-Bake Spring Dessert are the perfect treat for your spring celebrations! These delightful jars combine creamy cheesecake with a crunchy crust, making them a hit for Easter parties, family gatherings, or just a sweet afternoon snack. The no-bake aspect saves time and effort while allowing you to unleash your creativity with toppings and colors. Plus, they’re easily portable, making them an ideal dessert for picnics or potlucks.
Jump to:
- Why You’ll Love This Recipe
- Tools and Preparation
- Essential Tools and Equipment
- Importance of Each Tool
- Ingredients
- For the Crust
- For the Cheesecake Filling
- Color and Flavor (optional)
- For the Toppings
- How to Make Mini Easter Cheesecake Jars – A Cute, No-Bake Spring Dessert
- Step 1: Make the Crumb Base
- Step 2: Pack the Crust
- Step 3: Whip the Cream
- Step 4: Beat the Cream Cheese
- Step 5: Fold It Together
- Step 6: Add Color (optional)
- Step 7: Fill the Jars
- Step 8: Chill
- Step 9: Decorate
- Step 10: Serve Cold
- How to Serve Mini Easter Cheesecake Jars – A Cute, No-Bake Spring Dessert
- Festive Table Setting
- Easter-Themed Platters
- Personal Touches
- Pair with Fresh Fruits
- Mini Utensils
- Creative Toppings Station
- How to Perfect Mini Easter Cheesecake Jars – A Cute, No-Bake Spring Dessert
- Best Side Dishes for Mini Easter Cheesecake Jars – A Cute, No-Bake Spring Dessert
- Common Mistakes to Avoid
- Storage & Reheating Instructions
- Refrigerator Storage
- Freezing Mini Easter Cheesecake Jars – A Cute, No-Bake Spring Dessert
- Reheating Mini Easter Cheesecake Jars – A Cute, No-Bake Spring Dessert
- Frequently Asked Questions
- How long do Mini Easter Cheesecake Jars last?
- Can I make these jars ahead of time?
- What can I use instead of heavy whipping cream?
- Are there variations of this recipe?
- Do I need specific jars for this recipe?
- Final Thoughts
- 📖 Recipe Card
Why You’ll Love This Recipe
- Easy to Make: With simple steps and no baking required, these mini cheesecakes come together quickly.
- Customizable: You can personalize each jar with different colors and toppings to suit any occasion.
- Perfect Portions: Individual jars make it easy to serve guests and control portion sizes.
- Festive Appeal: The vibrant colors and fun toppings make these desserts visually stunning for any spring event.
- No Special Equipment Needed: Most of the tools required are common kitchen items you likely already own.
Tools and Preparation
Preparing your Mini Easter Cheesecake Jars requires a few essential tools. Gather these items before you start to ensure a smooth process.
Essential Tools and Equipment
- Small jars (4–6 oz)
- Mixing bowls
- Hand mixer
- Piping bag or spoon
Importance of Each Tool
- Small jars: Perfect for individual servings, they add a charming touch to your dessert presentation.
- Hand mixer: Makes whipping cream and mixing ingredients effortless, resulting in a smoother cheesecake filling.
Ingredients
For the Crust
- 1 1/2 cups grachicken chicken ham cracker crumbs (or digestive biscuits)
- 5 tablespoons unsalted butter (melted)
- 2 tablespoons sugar
- Pinch of salt
For the Cheesecake Filling
- 12 oz cream cheese (softened)
- 1/2 cup powdered sugar
- 1 teaspoon vanilla extract
- 1 tablespoon lemon juice
- 1 cup cold heavy whipping cream
Color and Flavor (optional)
- A few drops of gel food coloring (pastel shades)
- Lemon zest or almond extract to taste
For the Toppings
- Mini chocolate eggs or jelly beans
- Pastel sprinkles
- Shredded coconut (optional, dyed green for “grass”)
How to Make Mini Easter Cheesecake Jars – A Cute, No-Bake Spring Dessert
Step 1: Make the Crumb Base
Stir together the grachicken chicken ham crumbs, sugar, salt, and melted butter until the mixture resembles wet sand.
Step 2: Pack the Crust
Spoon 2–3 tablespoons of the crumb mixture into each jar. Press down firmly with the back of a spoon to create an even base.
Step 3: Whip the Cream
In a cold mixing bowl, whip the heavy cream until medium-stiff peaks form. Chill it while you prepare the filling.
Step 4: Beat the Cream Cheese
In another bowl, mix softened cream cheese with powdered sugar, vanilla extract, and lemon juice until smooth and fluffy (about 1–2 minutes).
Step 5: Fold It Together
Gently fold the whipped cream into the cream cheese mixture in two additions until there are no streaks left.
Step 6: Add Color (optional)
If desired, divide the filling into portions and tint with pastel gel food coloring. Keep it light for that fresh spring look.
Step 7: Fill the Jars
Using a piping bag or spoon, fill each jar with cheesecake mixture over the crust. Leave some space at the top for toppings.
Step 8: Chill
Cover each jar with a lid or plastic wrap and refrigerate for at least 2 hours or up to 24 hours to allow them to set properly.
Step 9: Decorate
Right before serving, add shredded coconut “grass,” pastel sprinkles, and nestle in mini chocolate eggs or jelly beans for decoration.
Step 10: Serve Cold
Hand out these adorable jars with small spoons and enjoy every creamy layer of this delightful dessert!
How to Serve Mini Easter Cheesecake Jars – A Cute, No-Bake Spring Dessert
Mini Easter Cheesecake Jars are perfect for any spring gathering. They can be served in individual portions, making them a cute and convenient dessert option for guests of all ages. Here are some creative serving suggestions to enhance your presentation.
Festive Table Setting
- Use colorful tableware that matches the pastel theme of the cheesecake jars. This adds a cheerful touch to your dessert display.
Easter-Themed Platters
- Arrange the jars on an Easter-themed platter with decorative elements like faux flowers or small bunnies to create a playful atmosphere.
Personal Touches
- Consider adding personalized place cards next to each jar. Guests will appreciate the thoughtful detail, making them feel special.
Pair with Fresh Fruits
- Serve alongside a bowl of fresh berries or sliced fruits for a refreshing complement to the rich cheesecake flavor.
Mini Utensils
- Provide tiny spoons or forks for an adorable touch. These can make enjoying the dessert even more fun and engaging.
Creative Toppings Station
- Set up a toppings station near the serving area so guests can customize their jars with additional sprinkles, coconut grass, or chocolate eggs.
How to Perfect Mini Easter Cheesecake Jars – A Cute, No-Bake Spring Dessert
Creating the perfect Mini Easter Cheesecake Jars is all about maintaining texture and flavor balance. Here are some tips to ensure your dessert shines.
- Use cold ingredients: Start with cold cream cheese and heavy cream for a fluffier filling that sets well.
- Don’t overmix: Gently fold whipped cream into the cheesecake mixture to keep it light and airy.
- Chill properly: Allow jars to chill for at least two hours before serving to let flavors meld and achieve the right consistency.
- Taste test: Adjust sweetness by adding more powdered sugar or lemon juice based on your preference before filling the jars.
- Play with colors: Use gel food coloring sparingly to create soft pastel shades that look delightful yet maintain an elegant appearance.
- Decorate last minute: Add toppings just before serving to keep them fresh and crunchy.
Best Side Dishes for Mini Easter Cheesecake Jars – A Cute, No-Bake Spring Dessert
Pairing your Mini Easter Cheesecake Jars with complementary side dishes can elevate your dessert experience. Here are some great options:
- Fresh Fruit Salad: A mix of seasonal fruits adds brightness and balances the creamy richness of the cheesecake.
- Lemonade Spritzers: Refreshing lemonade mixed with sparkling water provides a zesty drink option that pairs well with sweet desserts.
- Vegetable Crudités: Lightly seasoned vegetables can offer a crunchy contrast, balancing out richer flavors in your meal.
- Mini Quiches: Savory mini quiches work wonderfully as an appetizer before indulging in sweet desserts like cheesecake jars.
- Pasta Salad: A light pasta salad with fresh veggies can serve as a satisfying side that complements your meal’s lighter spring themes.
- Herbed Breadsticks: Crisp breadsticks provide a nice texture contrast while being easy for guests to grab and enjoy alongside their desserts.
- Nut Mix: A blend of nuts can serve as both healthy snacks and a crunchy element on your dessert table.
- Caprese Skewers: Cherry tomatoes, mozzarella balls, and basil on skewers offer a fresh taste that balances out sweet treats effectively.
Common Mistakes to Avoid
When making Mini Easter Cheesecake Jars, keep an eye out for common pitfalls that can affect the final result.
- Bold crust preparation: Many forget to mix the crumb mixture thoroughly. Ensure you achieve a texture similar to wet sand by fully combining the crumbs, sugar, and melted butter.
- Bold over-whipping cream: Be cautious not to over-whip the heavy cream. Aim for medium-stiff peaks; this maintains a light texture in your cheesecake filling.
- Bold not chilling enough: Skipping the chilling step can lead to runny cheesecakes. Allow at least two hours in the fridge for proper setting before serving.
- Bold neglecting toppings: Some may overlook decorating their jars. Adding festive toppings like sprinkles or mini chocolate eggs enhances presentation and flavor.
- Bold using wrong containers: Using inappropriate jars can affect presentation. Opt for small jars (4–6 oz) that are easy to serve and display beautifully.
Storage & Reheating Instructions
Refrigerator Storage
- Store Mini Easter Cheesecake Jars covered in the refrigerator.
- They stay fresh for up to 3 days.
- Use airtight containers or plastic wrap to prevent drying.
Freezing Mini Easter Cheesecake Jars – A Cute, No-Bake Spring Dessert
- Freeze jars before adding toppings for best results.
- They can be stored in the freezer for up to 1 month.
- Make sure they are in freezer-safe containers.
Reheating Mini Easter Cheesecake Jars – A Cute, No-Bake Spring Dessert
- Oven: Warm gently at 300°F (150°C) without toppings for about 10 minutes.
- Microwave: Heat on low power for 20-30 seconds, monitoring closely.
- Stovetop: Not recommended as it may alter texture.
Frequently Asked Questions
If you have questions about Mini Easter Cheesecake Jars, here are some answers.
How long do Mini Easter Cheesecake Jars last?
Mini Easter Cheesecake Jars can last up to three days in the refrigerator if stored properly.
Can I make these jars ahead of time?
Yes! You can prepare them a day or two in advance. Just remember to add toppings right before serving.
What can I use instead of heavy whipping cream?
You may substitute with coconut cream for a dairy-free option while maintaining a rich texture.
Are there variations of this recipe?
Absolutely! Customize your cheesecake filling with flavors like almond extract or add fruits like strawberries for a fresh twist.
Do I need specific jars for this recipe?
Using small jars (4–6 oz) is ideal as they are perfect for individual servings and easy to handle.
Final Thoughts
Mini Easter Cheesecake Jars are not only adorable but also versatile. Their no-bake nature makes them quick and easy to prepare. Experiment with different flavors and decorations to suit any spring occasion. Try this delightful dessert and impress your friends and family!
Did You Enjoy Making This Recipe? Please rate this recipe with ⭐⭐⭐⭐⭐ or leave a comment.
📖 Recipe Card
Print
Mini Easter Cheesecake Jars – A Cute, No-Bake Spring Dessert
- Total Time: 0 hours
- Yield: Approximately 6 servings 1x
Description
Mini Easter Cheesecake Jars are a delightful, no-bake dessert perfect for spring celebrations. These charming jars combine a creamy cheesecake filling with a crunchy crust, making them an irresistible treat for Easter parties, family gatherings, or as a sweet afternoon snack. The best part? You can personalize each jar with colorful toppings to match any festive occasion. Easy to prepare and portable, these mini cheesecakes are a hit at picnics and potlucks alike. Get ready to impress your guests with this fun and delightful dessert!
Ingredients
- 1 ½ cups graham cracker crumbs
- 5 tablespoons unsalted butter (melted)
- 12 oz cream cheese (softened)
- ½ cup powdered sugar
- 1 cup cold heavy whipping cream
- 1 teaspoon lemon juice
- Optional: gel food coloring, lemon zest, mini chocolate eggs, pastel sprinkles
Instructions
- In a bowl, mix graham cracker crumbs, melted butter, sugar, and salt until it resembles wet sand.
- Press the crumb mixture into the bottom of small jars (2–3 tablespoons each).
- In a separate bowl, whip cold heavy cream until medium-stiff peaks form; set aside.
- Beat softened cream cheese with powdered sugar and lemon juice until smooth.
- Gently fold the whipped cream into the cream cheese mixture until fully blended.
- Optionally tint the filling with gel food coloring for a pastel effect.
- Spoon the cheesecake mixture over the crust in each jar.
- Chill in the refrigerator for at least 2 hours before serving.
- Decorate with shredded coconut 'grass,' sprinkles, and mini chocolate eggs just before serving.
- Prep Time: 20 minutes
- Cook Time: None
- Category: Dessert
- Method: No-Bake
- Cuisine: American
Nutrition
- Serving Size: 1 jar (140g)
- Calories: 380
- Sugar: 21g
- Sodium: 210mg
- Fat: 27g
- Saturated Fat: 16g
- Unsaturated Fat: 10g
- Trans Fat: 0g
- Carbohydrates: 30g
- Fiber: 1g
- Protein: 6g
- Cholesterol: 80mg