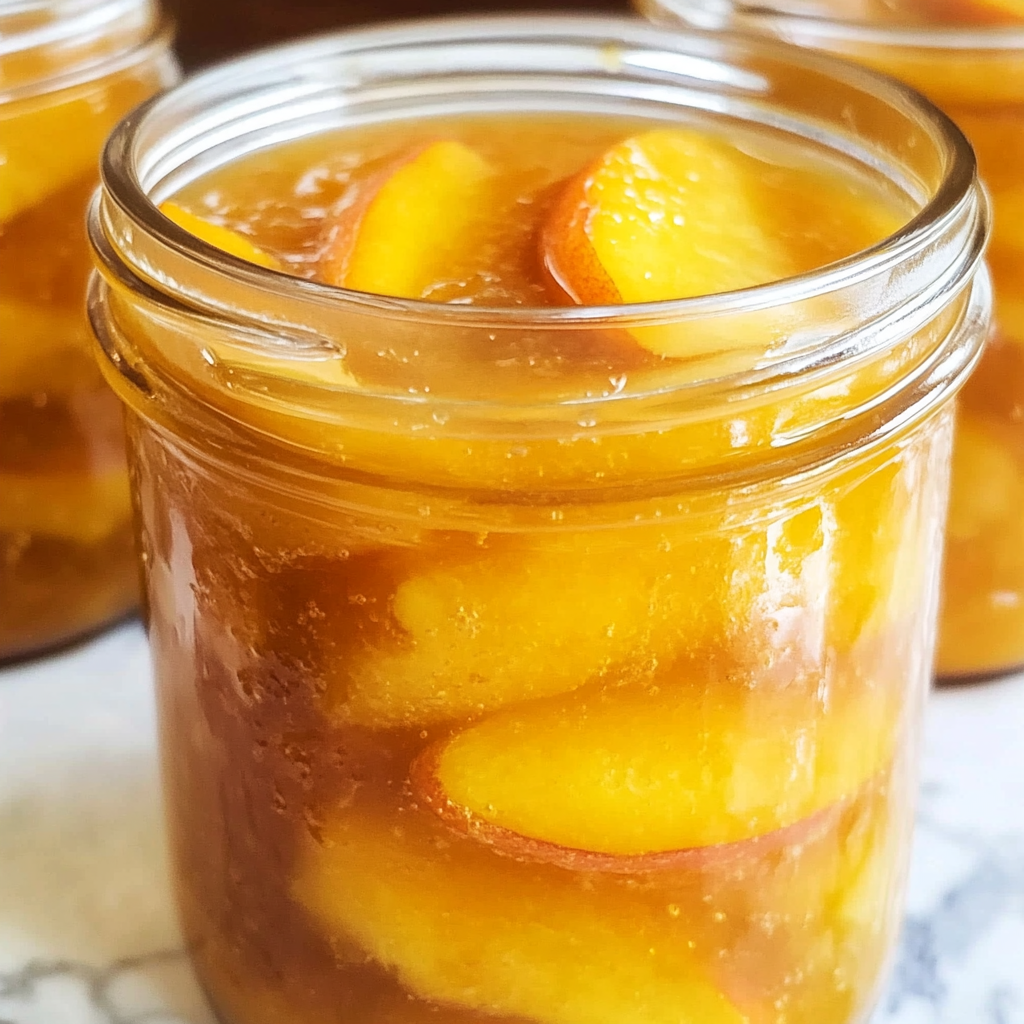
This Homemade Canned Peach Pie Filling is a delightful way to capture the essence of summer peaches in a jar! Perfect for pies, crisps, or cobblers, this filling combines fresh fruit with a silky texture. Whether it’s for a family gathering or a cozy dessert at home, you can enjoy the sweetness of peaches all year round. Plus, the easy water bath canning method makes it simple to preserve this treat!

Jump to:
- Why You’ll Love This Recipe
- Tools and Preparation
- Essential Tools and Equipment
- Importance of Each Tool
- Ingredients
- For Garnish
- How to Make Homemade Canned Peach Pie Filling
- Step 1: Prepare Jars
- Step 2: Prepare Peaches
- Step 3: Blanch Slices
- Step 4: Make Filling Base
- Step 5: Add Lemon Juice and Spices
- Step 6: Add Peaches
- Step 7: Fill Jars
- Step 8: Process Jars
- Step 9: Cool and Store
- How to Serve Homemade Canned Peach Pie Filling
- As a Classic Peach Pie
- In a Peach Crisp
- Over Vanilla Ice Cream
- In Pancakes or Waffles
- For Peach Cobbler
- As a Layer in Parfaits
- How to Perfect Homemade Canned Peach Pie Filling
- Best Side Dishes for Homemade Canned Peach Pie Filling
- Common Mistakes to Avoid
- Refrigerator Storage
- Freezing Homemade Canned Peach Pie Filling
- Reheating Homemade Canned Peach Pie Filling
- Frequently Asked Questions
- Can I use frozen peaches for homemade canned peach pie filling?
- How long does homemade canned peach pie filling last?
- Is it safe to use cornstarch instead of Clear Jel?
- How do I know if my jars sealed correctly?
- What recipes can I make with this peach pie filling?
- Final Thoughts
- 📖 Recipe Card
Why You’ll Love This Recipe
- Delicious Flavor: The combination of ripe peaches and warm spices creates a mouthwatering filling that elevates any dessert.
- Versatile Use: Ideal for making peach pies, cobblers, and even as a topping for ice cream or yogurt.
- Easy Preservation: This recipe utilizes water bath canning, ensuring your peach pie filling stays fresh and tasty for up to a year.
- Family-Friendly: Involve kids in the process—canning is not only fun but also teaches valuable kitchen skills.
- Seasonal Enjoyment: Capture the flavors of summer peaches and enjoy them long after the season ends.
Tools and Preparation
Before you start making your homemade canned peach pie filling, gather your tools. Having everything ready will streamline the process.
Essential Tools and Equipment
- Canning jars (quart-size)
- Large pot
- Mixing bowl
- Ladle
- Water bath canner
- Jar lifter
Importance of Each Tool
- Canning jars: Essential for storing your peach filling safely and securely.
- Water bath canner: Ensures proper processing of jars to maintain safety and quality during storage.
- Ladle: Helps in transferring hot filling into jars without spills.
Ingredients
This homemade canned peach pie filling is a sweet, spiced preserve made with fresh peaches and a thick, silky base—perfect for baking pies, crisps, or cobblers year-round. With this easy water bath canning method, you can enjoy the flavor of summer peaches even in winter.
Ingredients (for 4–5 quarts)
6 quarts fresh peaches, peeled, pitted, and sliced (about 24–30 medium peaches)
7 cups granulated sugar
2 cups cold water
1¾ cups clear jel (cook-type, not instant)
5¼ cups peach juice or water (from peaches or bottled)
½ cup bottled lemon juice
1½ teaspoons ground cinnamon (optional)
½ teaspoon ground nutmeg (optional)
For Garnish
- 2 tablespoons fresh parsley, finely chopped
How to Make Homemade Canned Peach Pie Filling
Step 1: Prepare Jars
Wash and sterilize 4–5 quart-size canning jars. Keep them warm until you’re ready to fill them.
Step 2: Prepare Peaches
Blanch peaches in boiling water for 30–60 seconds. Transfer them to an ice bath to cool. Peel, pit, and slice the peaches. To prevent browning, soak slices in water mixed with lemon juice or ascorbic acid.
Step 3: Blanch Slices
Boil sliced peaches in batches for about 1 minute. Drain them well and keep warm.
Step 4: Make Filling Base
In a large pot, whisk the sugar and clear jel together. Slowly stir in 2 cups of cold water and 5¼ cups of peach juice (or water). Cook over medium-high heat while stirring constantly until it thickens and begins to bubble.
Step 5: Add Lemon Juice and Spices
Stir in the bottled lemon juice along with cinnamon and nutmeg (if using). Boil for an additional minute.
Step 6: Add Peaches
Gently fold in the warm peach slices into the thickened mixture. Return it to a boil while stirring gently.
Step 7: Fill Jars
Using a ladle, fill the warm jars with hot filling while leaving about 1 inch of headspace at the top. Remove any air bubbles by running a spatula around the inside edges. Wipe down rims before sealing with lids and bands.
Step 8: Process Jars
Place jars into a boiling water bath canner. Process for about 30 minutes (adjust time based on altitude if necessary).
Step 9: Cool and Store
After processing, let jars sit undisturbed for 12–24 hours. Check seals after cooling; label jars accordingly. Store them in a cool dark place where they can last up to one year.
Enjoy making this delicious Homemade Canned Peach Pie Filling, bringing summer’s sweetness right into your kitchen!
How to Serve Homemade Canned Peach Pie Filling
Homemade canned peach pie filling is versatile and can enhance various desserts throughout the year. Here are some delightful ways to serve and enjoy this sweet treat.
As a Classic Peach Pie
- A traditional peach pie is a must-try. Pour the filling into a prepared pie crust, cover with another crust, and bake until golden brown for a delicious dessert.
In a Peach Crisp
- Combine the filling with a crumbly topping made of oats, flour, butter, and sugar. Bake for a warm and comforting dessert that pairs well with ice cream.
Over Vanilla Ice Cream
- Drizzle the warm peach filling over scoops of vanilla ice cream for an easy and indulgent treat. The combination of flavors is simply irresistible!
In Pancakes or Waffles
- Use the filling as a topping for pancakes or waffles. It adds a fruity sweetness that transforms breakfast into something special.
For Peach Cobbler
- Mix the filling with biscuit dough on top and bake until bubbly. This peach cobbler makes for a delightful dessert perfect for any occasion.
As a Layer in Parfaits
- Layer the canned peach filling with yogurt and granola in a glass for a delicious parfait. It’s a refreshing option for breakfast or snacks.
How to Perfect Homemade Canned Peach Pie Filling
To achieve the best flavor and texture in your homemade canned peach pie filling, consider these helpful tips.
- Use ripe peaches: Choose fresh, ripe peaches for the sweetest flavor. Overripe or under-ripe peaches may affect taste.
- Measure ingredients accurately: Ensure you measure sugar and clear jel precisely to maintain consistency in thickness.
- Adjust spices to taste: Customize your filling by adding more or less cinnamon and nutmeg based on your preference.
- Sterilize jars properly: Clean your canning jars thoroughly to prevent spoilage and ensure safe storage of your peach pie filling.
- Keep headspace in mind: Leave adequate headspace in jars to allow for expansion during processing without compromising seals.
- Store in cool, dark places: Keep your sealed jars away from light and heat to maintain quality for up to one year.
Best Side Dishes for Homemade Canned Peach Pie Filling
Pairing sides with homemade canned peach pie filling can create a complete meal experience. Here are some side dishes that complement its sweetness beautifully.
- Savory Roasted Chicken
A herb-marinated roasted chicken balances the sweetness of the peach filling perfectly. - Creamy Mashed Potatoes
The rich creaminess of mashed potatoes provides a contrast that enhances the fruitiness of desserts made with peach filling. - Grilled Vegetables
Charred seasonal vegetables add depth to any meal featuring sweet desserts like peach pies or cobblers. - Butter Biscuits
Flaky biscuits serve as an excellent accompaniment, perfect for soaking up extra juices from the peach filling. - Coleslaw
A tangy coleslaw helps cut through sweetness while adding crunch and freshness to your meal. - Cheese Platter
A selection of cheeses paired with crackers creates an elegant touch that balances well with sweet dishes like peach desserts. - Honey Glazed Carrots
Sweet carrots roasted with honey echo the flavors of peaches, making them an ideal side dish. - Vanilla Yogurt Dip
Serve this dip alongside fresh fruits as an appetizer before indulging in desserts featuring canned peach pie filling.
Common Mistakes to Avoid
Canning homemade peach pie filling can be a fun and rewarding process, but it’s essential to avoid common pitfalls. Here are some mistakes to watch out for:
- Not using the right Clear Jel: Using instant Clear Jel instead of cook-type can lead to a runny filling. Always choose cook-type Clear Jel for safe canning.
- Skipping sterilization: Failing to sterilize jars properly can introduce bacteria. Make sure to wash and keep jars warm before filling.
- Ignoring headspace guidelines: Leaving too little or too much headspace in jars can cause spoilage. Always leave 1 inch of headspace as specified in the recipe.
- Using fresh lemon juice: Fresh lemon juice may not provide consistent acidity for safe canning. Always use bottled lemon juice for reliable results.
- Not adjusting for altitude: If you live at a high altitude, processing times need adjustment. Check local guidelines to ensure proper processing times.
- Neglecting to check seals: Not verifying jar seals after cooling can lead to wasted effort. Always check seals before storing your jars away.
Refrigerator Storage
- Homemade peach pie filling lasts about 1 week in the refrigerator.
- Store in an airtight container to keep it fresh.
- Label the container with the date for easy tracking.
Freezing Homemade Canned Peach Pie Filling
- You can freeze this filling for up to 1 year.
- Use freezer-safe containers or heavy-duty freezer bags.
- Leave some space in containers for expansion during freezing.
Reheating Homemade Canned Peach Pie Filling
- Oven: Preheat to 350°F (175°C) and bake covered in an oven-safe dish until heated through, about 20–25 minutes.
- Microwave: Place in a microwave-safe bowl and heat on medium power, stirring every minute until warm, around 3–5 minutes total.
- Stovetop: Heat gently over low heat in a saucepan, stirring frequently until warmed through, usually about 5–7 minutes.
Frequently Asked Questions
Can I use frozen peaches for homemade canned peach pie filling?
You can use frozen peaches, but ensure they’re fully thawed and drained before preparing the filling. This helps maintain the right texture and flavor.
How long does homemade canned peach pie filling last?
When properly canned and stored in a cool, dark place, your homemade canned peach pie filling should last up to 1 year.
Is it safe to use cornstarch instead of Clear Jel?
No, using cornstarch is not safe for canning as it can affect the texture and stability of the filling. Stick with cook-type Clear Jel for safety.
How do I know if my jars sealed correctly?
To check if your jars sealed properly, press down on the lid; if it pops back up, it’s not sealed. Properly sealed lids will stay flat and secure.
What recipes can I make with this peach pie filling?
This delicious homemade canned peach pie filling is versatile! Use it in pies, cobblers, crisps, or even as a topping for pancakes and ice cream.
Final Thoughts
This homemade canned peach pie filling is truly delightful and allows you to enjoy fresh summer flavors all year long. Its versatility means you can easily customize it with different spices or fruits. Don’t hesitate—try making your own batch today!
Did You Enjoy Making This Recipe? Please rate this recipe with ⭐⭐⭐⭐⭐ or leave a comment.
📖 Recipe Card
Print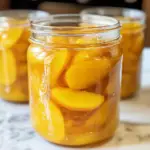
Homemade Canned Peach Pie Filling
- Total Time: 1 hour 10 minutes
- Yield: Approximately 10 servings (4–5 quarts total) 1x
Description
Homemade canned peach pie filling is a delightful way to savor the taste of summer all year round. This luscious filling, made from ripe peaches and warm spices, is incredibly versatile—perfect for classic peach pies, cobblers, or even as a topping for vanilla ice cream. The easy water bath canning method ensures that you can enjoy this delicious preserve long after peach season has ended.
Ingredients
- 6 quarts fresh peaches, peeled, pitted, and sliced
- 7 cups granulated sugar
- 2 cups cold water
- 1¾ cups clear jel (cook-type)
- 5¼ cups peach juice or water
- ½ cup bottled lemon juice
- 1½ teaspoons ground cinnamon (optional)
- ½ teaspoon ground nutmeg (optional)
Instructions
- Sterilize 4–5 quart-size canning jars and keep them warm.
- Blanch peaches in boiling water for 30–60 seconds; cool in an ice bath and slice.
- Boil peach slices in batches for about 1 minute; drain well.
- In a large pot, combine sugar and clear jel; add cold water and peach juice. Cook until thickened.
- Stir in lemon juice and spices; boil for an additional minute.
- Fold in warm peach slices; return to a gentle boil.
- Fill jars with hot mixture, leaving 1 inch of headspace; seal jars.
- Process jars in a boiling water bath for approximately 30 minutes.
- Cool jars undisturbed for 12–24 hours before checking seals.
- Prep Time: 30 minutes
- Cook Time: 40 minutes
- Category: Dessert
- Method: Canning
- Cuisine: American
Nutrition
- Serving Size: 1/2 cup or approx. 125g
- Calories: 202
- Sugar: 42g
- Sodium: 2mg
- Fat: 0g
- Saturated Fat: 0g
- Unsaturated Fat: 0g
- Trans Fat: 0g
- Carbohydrates: 52g
- Fiber: 2g
- Protein: <1g
- Cholesterol: 0mg