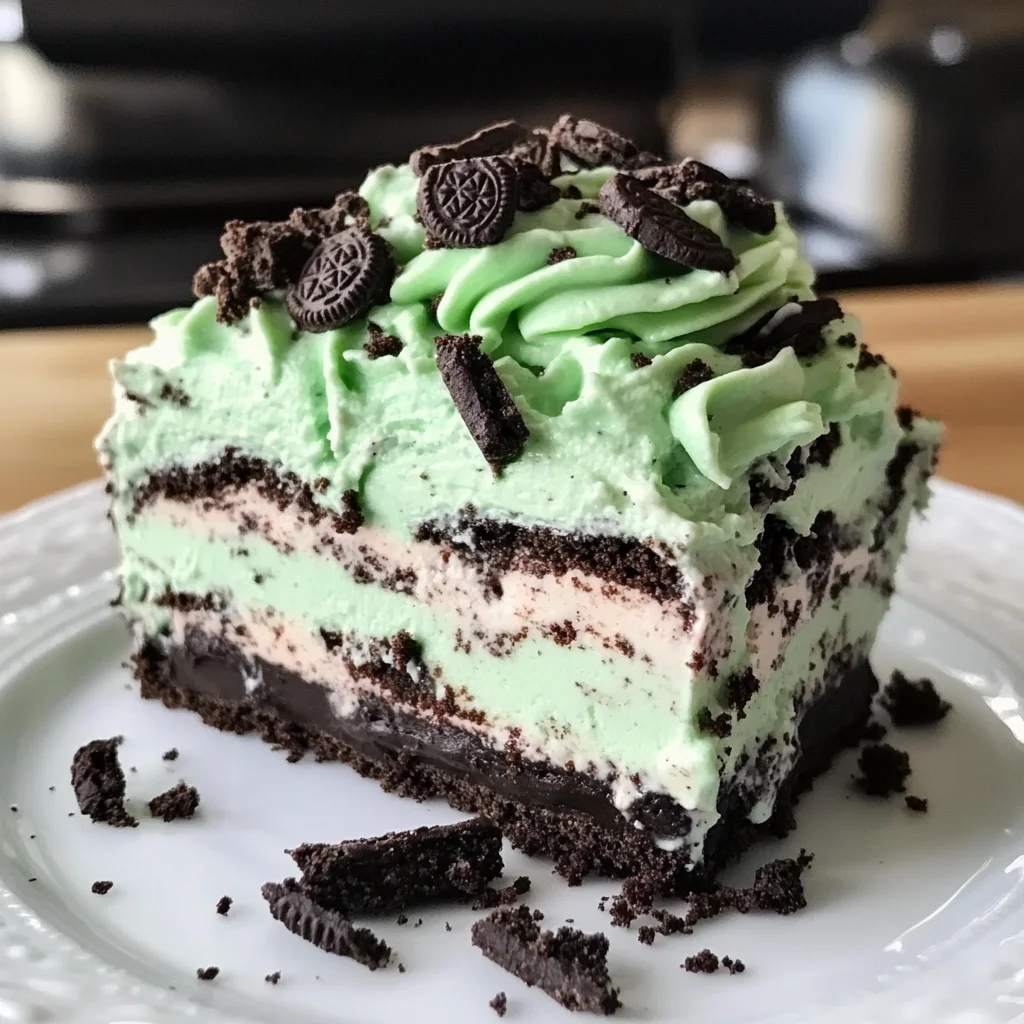
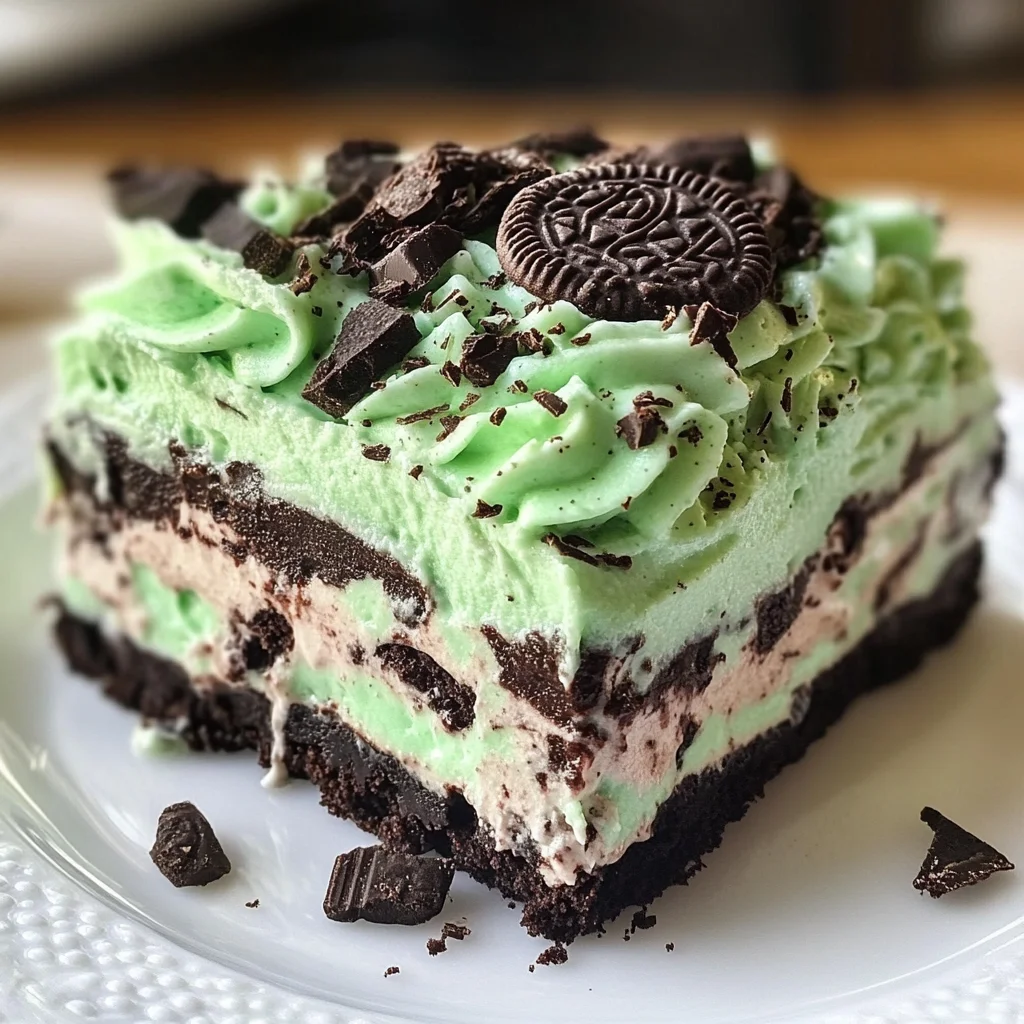
This Heavenly Mint OREO Dessert is a delightful no-bake pie that combines creamy layers with the crunch of mint-flavored cookies. Perfect for parties, family gatherings, or simply satisfying your sweet tooth, this dessert stands out with its vibrant mint flavor and easy preparation. You’ll love how quickly it comes together and how it impresses everyone who tries it!

Jump to:
- Why You’ll Love This Recipe
- Tools and Preparation
- Essential Tools and Equipment
- Importance of Each Tool
- Ingredients
- For the Pudding Layer
- For the Cream Cheese Layer
- For the Crust and Topping
- How to Make Heavenly Mint OREO Dessert
- Step 1: Prepare the Pudding Layer
- Step 2: Make the Cream Cheese Mixture
- Step 3: Crush the Mint Oreos
- Step 4: Assemble the Dessert
- Step 5: Finish with Whipped Topping
- Step 6: Chill Before Serving
- How to Serve Heavenly Mint OREO Dessert
- Individual Cups
- Mint Garnish
- Chocolate Drizzle
- Ice Cream Pairing
- Crushed Oreos on Top
- Party Platter
- How to Perfect Heavenly Mint OREO Dessert
- Best Side Dishes for Heavenly Mint OREO Dessert
- Common Mistakes to Avoid
- Storage & Reheating Instructions
- Refrigerator Storage
- Freezing Heavenly Mint OREO Dessert
- Reheating Heavenly Mint OREO Dessert
- Frequently Asked Questions
- How do I make Heavenly Mint OREO Dessert without gelatin?
- Can I customize my Heavenly Mint OREO Dessert?
- How long does it take to prepare Heavenly Mint OREO Dessert?
- What if I don’t have mint Oreos?
- Final Thoughts
- 📖 Recipe Card
Why You’ll Love This Recipe
- No-Bake Convenience: This dessert requires no baking, making it a quick option for busy days.
- Decadent Flavors: The combination of chocolate pudding and mint Oreos creates a rich and indulgent treat.
- Versatile Presentation: Great for any occasion, you can easily dress it up or keep it simple based on your needs.
- Kid-Friendly Fun: Easy enough for kids to help with, this dessert offers a fun way to get them involved in the kitchen.
- Chill Factor: With a refreshing mint flavor, it’s perfect for warm-weather gatherings.
Tools and Preparation
Before diving into the recipe, gather these essential tools to ensure a smooth cooking experience.
Essential Tools and Equipment
- Mixing bowls
- Electric mixer
- 9×11 baking dish
- Rolling pin
- Zipper bags
Importance of Each Tool
- Mixing bowls: These allow you to combine ingredients efficiently without creating a mess.
- Electric mixer: Using this tool saves time and ensures your cream cheese mixture is perfectly smooth.
- 9×11 baking dish: The right size for layering ingredients allows ample space for all the delicious components.
- Rolling pin: This helps crush the Oreos easily and uniformly for the crust.
Ingredients
Here are the ingredients you will need to create this Heavenly Mint OREO Dessert:
For the Pudding Layer
- 2 small packages instant chocolate pudding
- 3 ¼ Cup(s) milk
For the Cream Cheese Layer
- 1 8-ounce package cream cheese (room temperature)
- 1 Cup(s) powdered sugar
- 2 8-ounce containers whipped topping
For the Crust and Topping
- 1 package mint Oreos
- ½ Cup(s) butter (melted)
- Green food coloring
How to Make Heavenly Mint OREO Dessert
Step 1: Prepare the Pudding Layer
- In a large mixing bowl, whisk together the instant chocolate pudding and milk. Continue whisking until set.
Step 2: Make the Cream Cheese Mixture
- In another bowl, use an electric mixer to cream together the cream cheese and powdered sugar. Blend until smooth.
- Fold in one container of whipped topping, adding in a few drops of green food coloring. Stir until well combined.
Step 3: Crush the Mint Oreos
- Place the mint Oreos into a large zipper bag.
- Use a rolling pin to crush them into fine crumbs.
Step 4: Assemble the Dessert
- Pour half of the crushed Oreos into the bottom of a 9×11 baking dish.
- Drizzle melted butter evenly over the crushed cookies. Stir to combine and press firmly into an even layer at the bottom of the pan.
- Spread the cream cheese mixture over this crust, smoothing it out evenly.
- Next, pour and spread the prepared chocolate pudding over the cream cheese layer.
Step 5: Finish with Whipped Topping
- In a separate medium bowl, mix green food coloring with the second container of whipped topping until desired color is achieved.
- Spread this green whipped topping evenly over the pudding layer.
- Finally, sprinkle with remaining crushed Oreos on top.
Step 6: Chill Before Serving
- Cover your dessert with plastic wrap or foil.
- Refrigerate for at least two hours before serving to allow it to set properly.
Now you have created a delightful Heavenly Mint OREO Dessert that is sure to impress! Enjoy every creamy bite of this luscious treat!
How to Serve Heavenly Mint OREO Dessert
Serving the Heavenly Mint OREO Dessert is all about enhancing its delightful flavors and making it visually appealing. Here are some creative ideas to present this delicious dessert to your guests.
Individual Cups
- Use clear dessert cups for individual servings. Layer the dessert in the cups for an elegant presentation.
Mint Garnish
- Top each serving with fresh mint leaves. This adds a pop of color and a hint of freshness that complements the dessert.
Chocolate Drizzle
- Drizzle melted chocolate over the top before serving. It enhances both flavor and appearance, making each bite even more indulgent.
Ice Cream Pairing
- Serve alongside a scoop of vanilla or mint-flavored ice cream. The creaminess balances the richness of the dessert.
Crushed Oreos on Top
- Add extra crushed Oreos as a topping just before serving. It provides a crunchy texture that contrasts beautifully with the creamy layers.
Party Platter
- Arrange slices on a decorative platter for gatherings. This makes it easy for guests to help themselves while showcasing the dessert’s layers.
How to Perfect Heavenly Mint OREO Dessert
To ensure your Heavenly Mint OREO Dessert turns out perfect every time, consider these useful tips.
- Use Room Temperature Ingredients: Make sure your cream cheese is at room temperature for easier mixing and a smoother texture.
- Chill Time is Crucial: Allow the dessert to chill for at least two hours. This helps all flavors meld together beautifully.
- Adjust Sweetness: Taste your cream cheese mixture and adjust powdered sugar if you prefer a sweeter or less sweet filling.
- Layer Carefully: Take your time layering each component. A careful approach ensures even distribution and enhances presentation.
- Experiment with Colors: Feel free to add more or less green food coloring based on your preference for color intensity.
- Store Properly: Keep leftovers covered in the refrigerator for up to three days to maintain freshness.
Best Side Dishes for Heavenly Mint OREO Dessert
Pairing side dishes with your Heavenly Mint OREO Dessert can elevate your meal experience. Here are some great options to consider.
Fresh Fruit Salad
A mix of seasonal fruits adds brightness and balances sweetness, adding freshness to your meal.Chocolate-Covered Strawberries
These complementary treats provide an extra chocolatey richness, perfect for chocolate lovers.Mini Cheesecakes
Bite-sized cheesecakes offer a creamy counterpart that pairs wonderfully with mint flavors without overpowering them.Vanilla Pudding Cups
Simple yet satisfying, vanilla pudding cups are an easy side that complements the rich minty dessert nicely.Lemon Sorbet
The refreshing tartness of lemon sorbet acts as a palate cleanser between bites, enhancing the mint flavor profile.Chocolate Chip Cookies
Classic cookies provide chewy texture and additional sweetness, making them an irresistible companion to this dessert.Coffee or Tea Service
Offering coffee or tea adds warmth and helps balance sweetness while providing a cozy finish to your meal.Nutty Granola Bars
Crunchy granola bars add texture contrast and can be enjoyed as a casual side snack alongside the dessert.
Common Mistakes to Avoid
When making the Heavenly Mint OREO Dessert, it’s easy to run into a few common pitfalls. Here are some mistakes to watch out for:
- Not letting the pudding set properly: If you don’t whisk the pudding long enough or use the right amount of milk, it won’t thicken. Make sure to follow the instructions closely for best results.
- Overmixing the cream cheese: Mixing too long can make your cream cheese mixture too runny. Blend just until smooth and creamy to keep the consistency perfect.
- Skipping the chilling time: This dessert needs at least two hours in the fridge to set up correctly. Don’t rush this step; it enhances flavor and texture.
- Crushing Oreos too finely: If your Oreo pieces are too small, they won’t create a sturdy crust. Aim for larger chunks but not whole cookies for better structure.
- Not using room temperature ingredients: Cold cream cheese can be hard to mix and may leave lumps in your filling. Allow it to come to room temperature before mixing.
Storage & Reheating Instructions
Refrigerator Storage
- Store in an airtight container for up to 3 days.
- Keep any leftovers refrigerated to maintain freshness.
Freezing Heavenly Mint OREO Dessert
- You can freeze this dessert for up to 2 months.
- Use a freezer-safe container, and cover tightly with plastic wrap or aluminum foil.
Reheating Heavenly Mint OREO Dessert
- Oven: Not recommended as it may alter the texture of the dessert.
- Microwave: Heat individual portions on low power for about 15-20 seconds; check frequently.
- Stovetop: Not advisable since this dessert is best served chilled.
Frequently Asked Questions
Here are some common questions about making this delightful dessert:
How do I make Heavenly Mint OREO Dessert without gelatin?
You don’t need gelatin! The pudding mixture provides enough structure when it sets in the refrigerator.
Can I customize my Heavenly Mint OREO Dessert?
Absolutely! You can use different flavored Oreos or add layers of fruit like raspberries for a twist.
How long does it take to prepare Heavenly Mint OREO Dessert?
Prep time is about 20 minutes, but don’t forget about the chilling time of at least 2 hours before serving.
What if I don’t have mint Oreos?
You can substitute with regular Oreos and add mint extract to your cream cheese mixture for that minty flavor!
Final Thoughts
This Heavenly Mint OREO Dessert is an indulgent treat that’s perfect for any occasion. Its no-bake nature makes it easy to whip up, while its rich flavors will impress everyone. Feel free to customize with your favorite flavors or toppings—get creative and enjoy every bite!
Did You Enjoy Making This Recipe? Please rate this recipe with ⭐⭐⭐⭐⭐ or leave a comment.
📖 Recipe Card
Print
Heavenly Mint OREO Dessert
- Total Time: 0 hours
- Yield: Serves 12 1x
Description
Indulge in the delightful layers of Heavenly Mint OREO Dessert, a no-bake treat that marries the refreshing taste of mint with the rich creaminess of chocolate. This easy-to-make dessert is perfect for any occasion, whether you’re hosting a party or simply satisfying your sweet cravings. With its vibrant green hue and creamy texture, this dessert not only tastes incredible but also serves as a visually appealing centerpiece. Impress your guests with this simple yet decadent dish that comes together in no time!
Ingredients
- 2 small packages instant chocolate pudding
- 3 ¼ cups milk
- 1 8-ounce package cream cheese (room temperature)
- 1 cup powdered sugar
- 2 8-ounce containers whipped topping
- 1 package mint Oreos
- ½ cup butter (melted)
- Green food coloring
Instructions
- In a large bowl, whisk together the chocolate pudding and milk until set.
- In another bowl, cream together the room temperature cream cheese and powdered sugar using an electric mixer until smooth. Fold in one container of whipped topping and a few drops of green food coloring.
- Crush the mint Oreos in a zipper bag using a rolling pin.
- Layer half of the crushed Oreos in a baking dish, drizzle melted butter over them, and press down to form a crust. Spread the cream cheese mixture on top, followed by the chocolate pudding layer.
- Mix green food coloring into the second container of whipped topping and spread it on top of the pudding layer. Finish by sprinkling the remaining crushed Oreos.
- Cover and refrigerate for at least two hours before serving.
- Prep Time: 20 minutes
- Cook Time: N/A
- Category: Dessert
- Method: No-Bake
- Cuisine: American
Nutrition
- Serving Size: 1 slice (100g)
- Calories: 280
- Sugar: 22g
- Sodium: 220mg
- Fat: 16g
- Saturated Fat: 9g
- Unsaturated Fat: 6g
- Trans Fat: 0g
- Carbohydrates: 31g
- Fiber: 1g
- Protein: 4g
- Cholesterol: 30mg