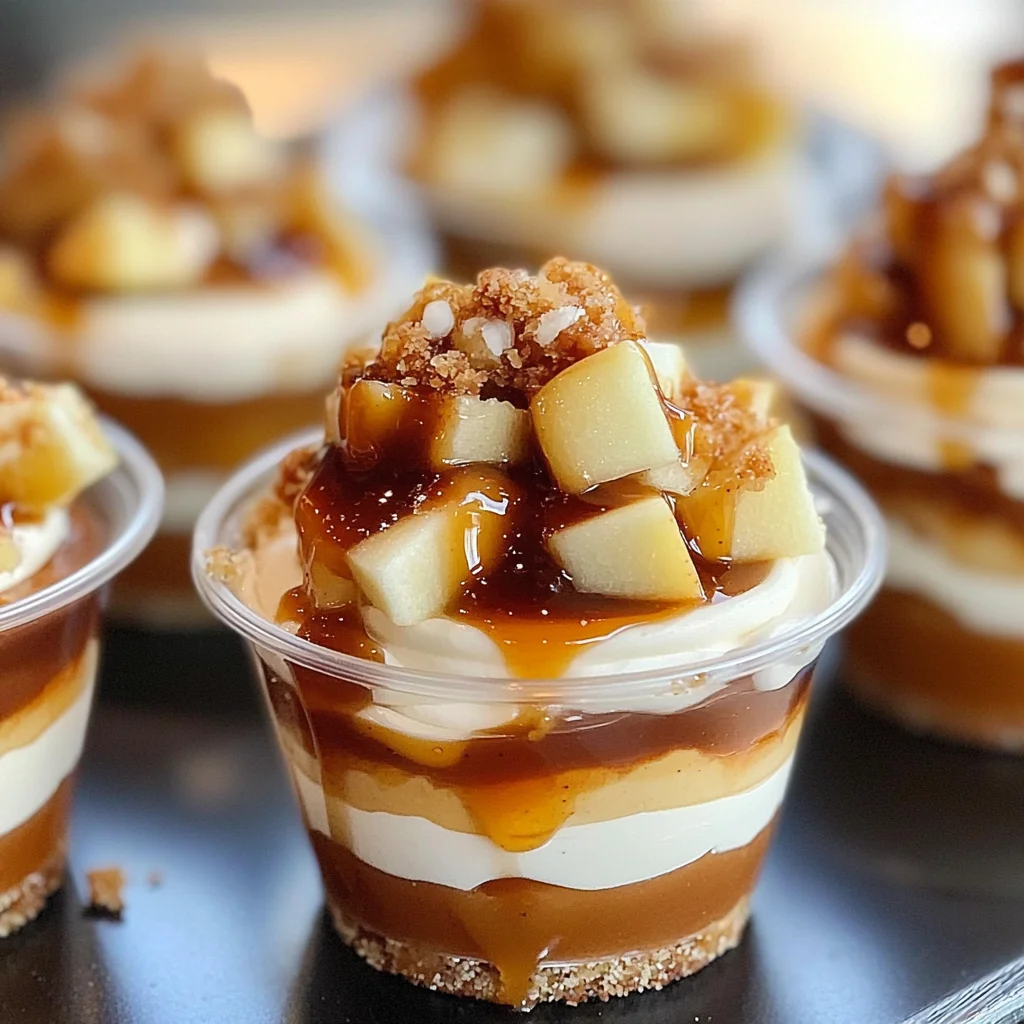
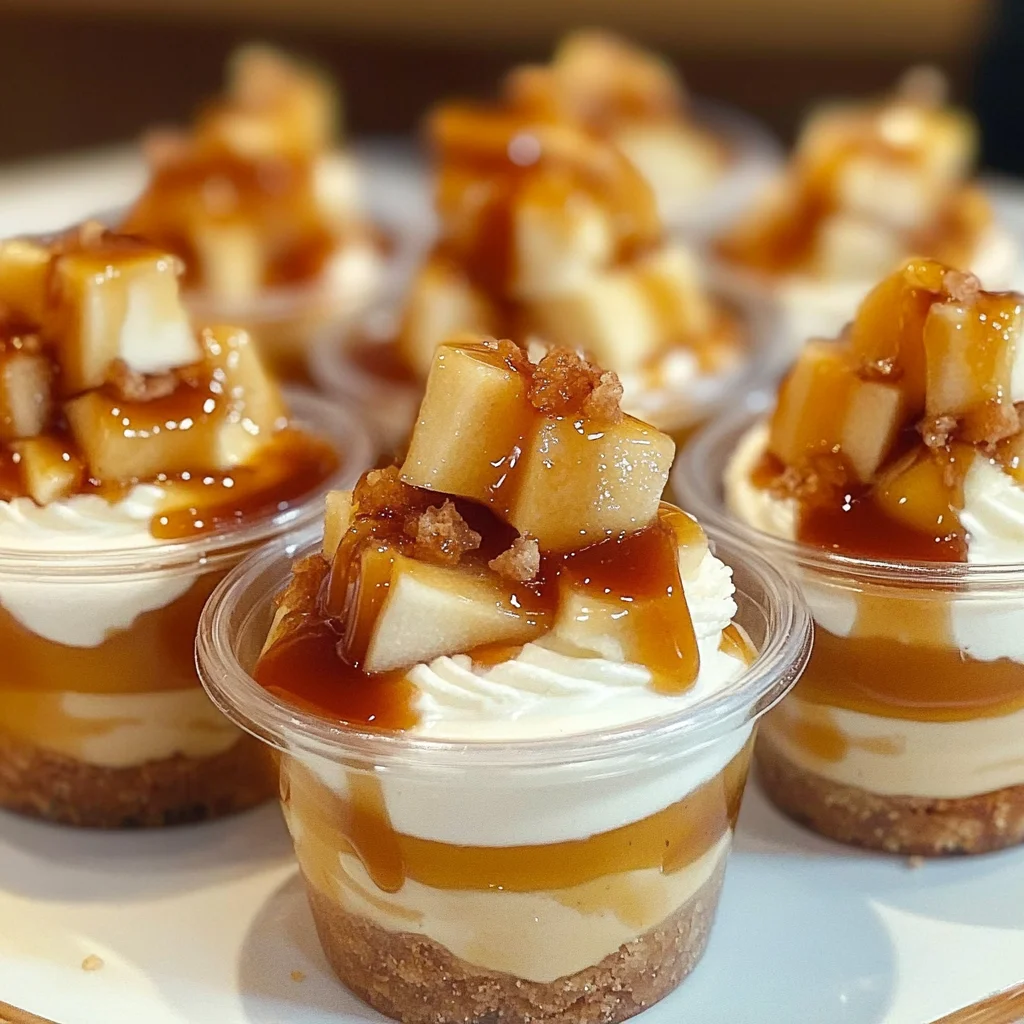
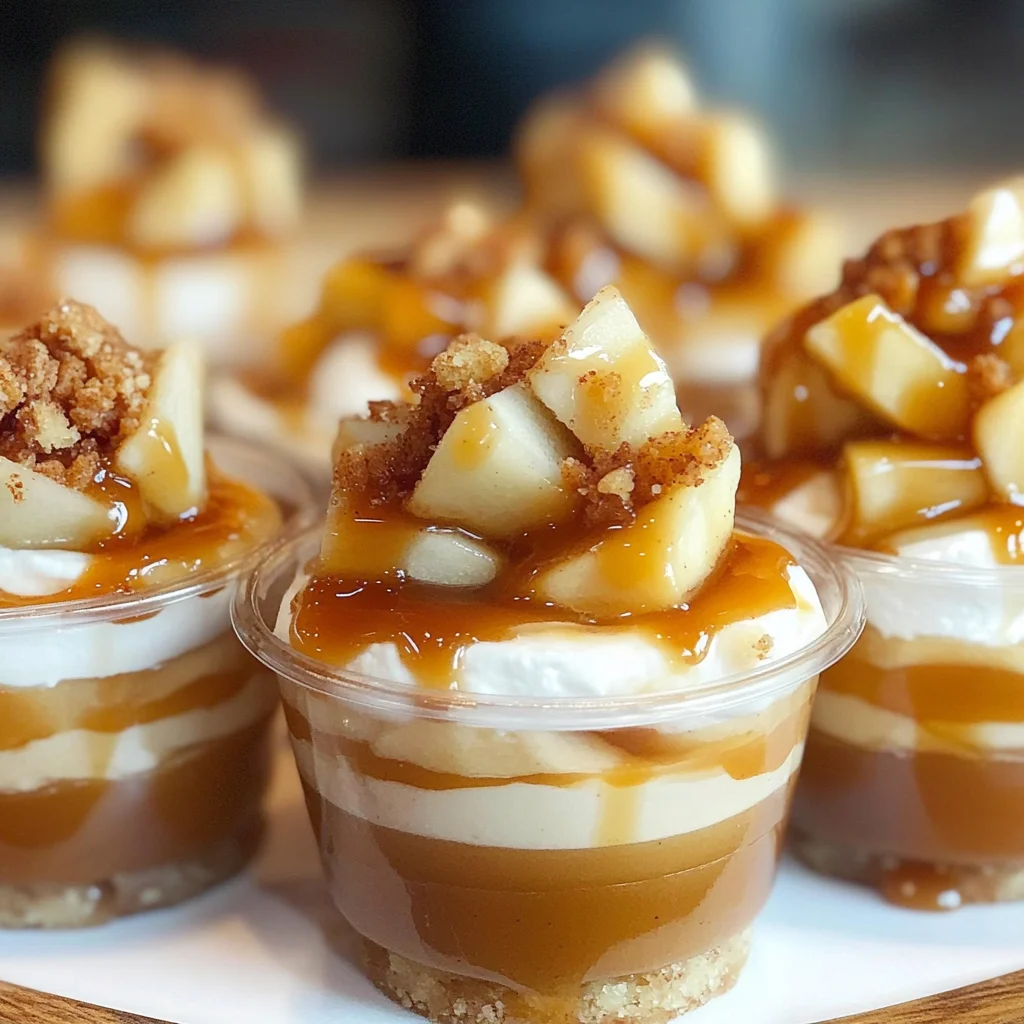
Caramel apple dessert cups are an easy, delicious, and portable no-bake dessert. They feature a delightful blend of vanilla wafer crust, salted caramel mousse, and cinnamon apples, all drizzled with salted caramel sauce. Perfect for gatherings or special occasions, these dessert cups bring the taste of fall right to your table.
Jump to:
- Why You’ll Love This Recipe
- Tools and Preparation
- Essential Tools and Equipment
- Importance of Each Tool
- Ingredients
- For the Cinnamon Apples
- For the Vanilla Wafer Crust
- For the Salted Caramel Mousse
- For Garnish
- How to Make Caramel Apple Dessert Cups
- Step 1: Cook the Cinnamon Apples
- Step 2: Prepare Vanilla Wafer Crust
- Step 3: Portion Out Crust into Cups
- Step 4: Make Salted Caramel Mousse
- Step 5: Whip Heavy Cream
- Step 6: Pipe Mousse into Cups
- Step 7: Add Cinnamon Apples
- Step 8: Chill Before Serving
- How to Serve Caramel Apple Dessert Cups
- Individual Treats
- Family Style
- Holiday Gatherings
- Kid-Friendly Snacks
- Dessert Bar Station
- How to Perfect Caramel Apple Dessert Cups
- Best Side Dishes for Caramel Apple Dessert Cups
- Common Mistakes to Avoid
- Storage & Reheating Instructions
- Refrigerator Storage
- Freezing Caramel Apple Dessert Cups
- Reheating Caramel Apple Dessert Cups
- Frequently Asked Questions
- How To Make Caramel Apple Dessert Cups?
- Can I Use Other Fruits in Caramel Apple Dessert Cups?
- Are Caramel Apple Dessert Cups Suitable For Parties?
- How Long Do Caramel Apple Dessert Cups Last?
- Final Thoughts
- 📖 Recipe Card
Why You’ll Love This Recipe
- Easy to Make: With simple steps and minimal cooking time, anyone can whip up these delightful treats.
- Portable Treats: Served in cups, they are perfect for parties, picnics, or potlucks.
- Delicious Flavor Combination: The combination of sweet caramel and spiced apples creates a flavor explosion that everyone will love.
- Customizable: Feel free to add your favorite toppings or adjust the sweetness to suit your taste.
- No-Bake Convenience: These dessert cups require no baking, making them a hassle-free option for dessert lovers.
Tools and Preparation
Before diving into making your Caramel Apple Dessert Cups, ensure you have the right tools on hand. Having everything ready will make the process smoother and more enjoyable.
Essential Tools and Equipment
- Mixing bowls
- Medium saucepan
- Electric hand mixer
- Small cookie scoop
- 28 – 2 ounce plastic cups
- Piping bag
Importance of Each Tool
- Mixing Bowls: Essential for combining ingredients effectively without any mess.
- Electric Hand Mixer: Speeds up the whipping process for the mousse, ensuring a light and airy texture.
- Small Cookie Scoop: Perfect for portioning out the crust evenly into cups.
Ingredients
To create your delectable Caramel Apple Dessert Cups, gather these ingredients:
For the Cinnamon Apples
- 4 cups apples (peeled and chopped)
- ½ cup light brown sugar
- 1 tsp cinnamon
For the Vanilla Wafer Crust
- 2 cups vanilla wafer crumbs
- ¼ cup salted or unsalted butter (melted)
For the Salted Caramel Mousse
- 1 pkg instant vanilla pudding mix (3.4 ounces)
- 1 cup milk
- ⅓ cup salted caramel sauce
- 1 ½ cups heavy cream
For Garnish
- Additional caramel sauce for garnish
How to Make Caramel Apple Dessert Cups
Step 1: Cook the Cinnamon Apples
In a medium saucepan, combine peeled and chopped apples, brown sugar, and cinnamon. Stir well and cook over medium heat until the apples soften and the liquid thickens. Once done, set aside to cool.
Step 2: Prepare Vanilla Wafer Crust
In a mixing bowl, combine vanilla wafer crumbs with melted butter. Stir until fully incorporated.
Step 3: Portion Out Crust into Cups
Portion the vanilla wafer mixture into 28 – 2 ounce plastic cups using a small cookie scoop. Press down with the back of one of the plastic cups to form a firm crust.
Step 4: Make Salted Caramel Mousse
In a large mixing bowl, combine instant vanilla pudding mix with milk. Whisk together until smooth and chill for about 5 minutes. Then add in salted caramel sauce and mix it in using an electric hand mixer on medium speed until fully blended.
Step 5: Whip Heavy Cream
Pour in heavy cream to the pudding mixture. Using an electric hand mixer, whip this mixture for about 3-5 minutes until it becomes thick and creamy.
Step 6: Pipe Mousse into Cups
Transfer the caramel mousse into a piping bag. Pipe this luscious mousse into each plastic cup on top of your prepared vanilla wafer crust.
Step 7: Add Cinnamon Apples
Using a spoon, carefully add portions of cinnamon apples over the caramel mousse layer. Drizzle additional caramel sauce on top if desired.
Step 8: Chill Before Serving
Seal each cup with a lid or cover them gently with plastic wrap. Chill in the refrigerator for at least an hour before serving or store for up to 2 to 3 days.
Enjoy your delightful Caramel Apple Dessert Cups!
How to Serve Caramel Apple Dessert Cups
Caramel apple dessert cups are a delightful treat that can be enjoyed in various ways. Here are some serving suggestions to elevate your dessert experience.
Individual Treats
- Serve each cup as a standalone dessert for easy portion control. Perfect for parties and gatherings!
Family Style
- Arrange the cups on a large platter for a beautiful presentation. This encourages guests to help themselves while creating a festive atmosphere.
Holiday Gatherings
- Use themed decorations or toppings, such as crushed nuts or seasonal sprinkles, to match the occasion. It’s an easy way to make them more festive!
Kid-Friendly Snacks
- These cups are ideal for kids’ parties or after-school snacks. The fun presentation and sweet flavors will surely please young ones.
Dessert Bar Station
- Set up a dessert bar with toppings like whipped cream, chocolate chips, or extra caramel sauce. Let guests customize their own cups for added fun!
How to Perfect Caramel Apple Dessert Cups
Creating the perfect caramel apple dessert cups is all about technique and attention to detail. Here are some tips to ensure your cups turn out wonderfully.
Use Fresh Apples: Fresh apples not only taste better but also provide the right texture for the filling. Choose crisp varieties like Granny Smith or Honeycrisp.
Chill the Mousse: Allow the caramel mousse to chill before piping it into the cups. This helps it maintain its structure and makes it easier to work with.
Balance Sweetness: Adjust the amount of caramel sauce based on your taste preferences. Too much can overwhelm the flavors, so start with less and add more if needed.
Layer Wisely: For an appealing look, layer the mousse and cinnamon apples carefully in each cup. This creates visual interest and enhances flavor in every bite.
Seal Properly: If you’re storing them for later, ensure that you seal each cup tightly with a lid or plastic wrap to keep them fresh.
Best Side Dishes for Caramel Apple Dessert Cups
Pairing side dishes with caramel apple dessert cups can enhance your overall meal experience. Here are some delightful options.
Cheese Platter: A selection of cheeses complements the sweetness of the dessert; consider sharp cheddar or creamy brie for contrast.
Fruit Salad: A light fruit salad adds freshness and balances the richness of the dessert cups; include seasonal fruits like berries or citrus.
Savory Crackers: Offer a variety of savory crackers for a crunchy texture that contrasts nicely with the smooth dessert cups.
Spiced Nuts: Roasted spiced nuts add crunch and a hint of saltiness that pairs well with the sweet flavors of caramel.
Mini Quiches: These bite-sized savory treats make a great contrast against sweet desserts, adding variety to your spread.
Vanilla Ice Cream: A scoop of vanilla ice cream beside your cups creates an indulgent treat perfect for any occasion!
Hot Chocolate Bar: Set up a hot chocolate station with toppings like whipped cream and marshmallows for a cozy accompaniment to your desserts.
Common Mistakes to Avoid
Creating delicious caramel apple dessert cups is enjoyable, but common mistakes can hinder your results. Here are some pitfalls to watch out for:
- Incorrect Apple Variety: Using apples that are too soft can lead to mushy filling. Choose firm apples like Granny Smith or Honeycrisp for the best texture.
- Skipping Chilling Time: Not allowing the mousse to chill properly can result in a runny consistency. Always chill your mousse for at least 5 minutes before serving.
- Overmixing the Cream: Overwhipping the heavy cream can turn it into butter consistency. Mix until just thick and creamy for the perfect mousse.
- Inconsistent Crust Base: Failing to press the crust evenly can make it fall apart. Use a measuring cup to ensure an even layer when packing the crumbs.
- Neglecting Garnish: Skipping additional caramel sauce on top diminishes flavor and presentation. A drizzle adds both taste and visual appeal.
Storage & Reheating Instructions
Refrigerator Storage
- Store in airtight containers for up to 3 days.
- Ensure cups are sealed tightly to maintain freshness.
Freezing Caramel Apple Dessert Cups
- Freeze for up to 1 month in freezer-safe containers.
- Allow to thaw overnight in the refrigerator before serving.
Reheating Caramel Apple Dessert Cups
- Oven: Preheat oven to 350°F (175°C) and warm cups covered with foil for about 10 minutes.
- Microwave: Heat on medium power for 20-30 seconds, checking frequently to avoid overheating.
- Stovetop: Use a double boiler, gently warming without direct heat until slightly warm.
Frequently Asked Questions
Here are answers to some common questions regarding caramel apple dessert cups.
How To Make Caramel Apple Dessert Cups?
To make caramel apple dessert cups, start by preparing a vanilla wafer crust, then layer with salted caramel mousse and topped with cinnamon apples and caramel sauce.
Can I Use Other Fruits in Caramel Apple Dessert Cups?
Yes! Feel free to experiment with pears or berries for a different flavor profile while keeping the same base recipe.
Are Caramel Apple Dessert Cups Suitable For Parties?
Absolutely! These dessert cups are portable and easy to serve, making them ideal for gatherings and parties.
How Long Do Caramel Apple Dessert Cups Last?
When stored properly, they last up to 3 days in the refrigerator or up to 1 month if frozen.
Final Thoughts
Caramel apple dessert cups combine delightful flavors and textures in a portable format. They are perfect for any occasion, from casual gatherings to festive celebrations. Feel free to customize them by adding nuts or experimenting with different fruits!
Did You Enjoy Making This Recipe? Please rate this recipe with ⭐⭐⭐⭐⭐ or leave a comment.
📖 Recipe Card
Print
Caramel Apple Dessert Cups
- Total Time: 30 minutes
- Yield: Serves approximately 28 dessert cups 1x
Description
Indulge in the delightful flavors of Caramel Apple Dessert Cups, a no-bake treat that captures the essence of autumn in every bite. These portable dessert cups feature a crunchy vanilla wafer crust layered with creamy salted caramel mousse and topped with warm, spiced cinnamon apples. Drizzled with extra caramel sauce, they are perfect for any gathering, from fall celebrations to casual get-togethers. Easy to make and customize, these dessert cups will impress guests of all ages while offering a sweet escape into seasonal bliss.
Ingredients
- 4 cups peeled and chopped apples
- ½ cup light brown sugar
- 1 tsp cinnamon
- 2 cups vanilla wafer crumbs
- ¼ cup melted butter
- 1 package instant vanilla pudding mix (3.4 ounces)
- 1 cup milk
- ⅓ cup salted caramel sauce
- 1½ cups heavy cream
Instructions
- Cook the apples: In a medium saucepan, combine apples, brown sugar, and cinnamon. Cook over medium heat until softened; set aside to cool.
- Prepare the crust: Mix vanilla wafer crumbs with melted butter in a bowl until combined.
- Portion the crust: Use a small cookie scoop to fill plastic cups with the crust mixture and press down firmly.
- Make the mousse: Combine pudding mix and milk in a bowl; whisk until smooth. Add caramel sauce and blend using an electric mixer.
- Whip cream: Fold heavy cream into the pudding mixture until thick and creamy.
- Assemble cups: Pipe mousse on top of the crust, add cinnamon apples, and drizzle with additional caramel sauce.
- Chill: Cover and refrigerate for at least an hour before serving.
- Prep Time: 20 minutes
- Cook Time: 10 minutes
- Category: Dessert
- Method: No-Bake
- Cuisine: American
Nutrition
- Serving Size: 1 serving
- Calories: 250
- Sugar: 18g
- Sodium: 120mg
- Fat: 15g
- Saturated Fat: 9g
- Unsaturated Fat: 5g
- Trans Fat: 0g
- Carbohydrates: 30g
- Fiber: 2g
- Protein: 3g
- Cholesterol: 45mg